
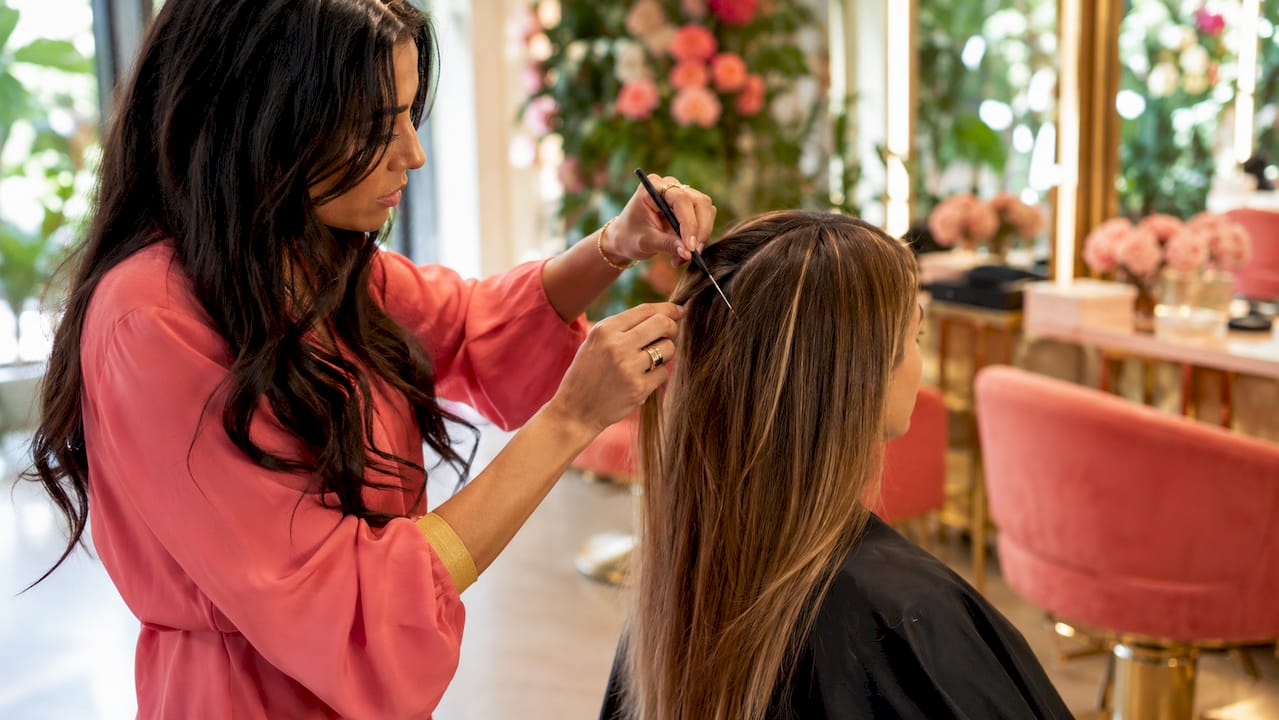
Sectioning in hair braiding is the precise division of hair into organized parts to control tension, create clean braid lines, and protect scalp health throughout the install. The role of sectioning in braiding goes far beyond simply splitting hair into groups. It determines whether your braids last two weeks or two months, whether your scalp aches by day three, and whether your finished style looks polished or uneven. Tools like a rat-tail comb, tension clips, and pre-braid balm are the foundation of professional sectioning. Every braid tells a story, and that story starts with how the hair is divided.
How does proper sectioning affect braid quality and longevity?
Sectioning quality is the single biggest factor in how long your braids hold up. Improper sectioning causes 80% of DIY braiding failures, specifically because uneven strand thickness creates tension imbalances that trigger frizz and unraveling within minutes of movement. That number tells you something important: most braid problems are not a product issue or a skill issue. They are a preparation issue.
When strands are unequal in thickness, the thicker strand carries more weight. The thinner strand stretches under pressure. The result is a braid that looks lumpy, loses definition quickly, and puts uneven stress on the follicles underneath. Salon-standard braiding maintains even tension across all three strands from root to tip, and that consistency only comes from precise sectioning before a single cross is made.
Hair condition matters just as much as technique. Braiding with hair that is not 100% dry at the root causes mid-section frizz within hours because moisture at the root enters the first cross of the braid and works outward. Applying a pre-braid balm on mid-lengths and edges lays the cuticle flat, improves grip, and helps each section stay neat through the entire install.
Pro Tip: Before you section, stretch and smooth each portion of hair with a rat-tail comb. This reveals uneven density spots you can correct before they become visible braid problems.
The benefits of sectioning for braids compound over time. A well-sectioned style worn for six weeks looks cleaner at week five than a poorly sectioned style does at week two. Precision at the start protects your investment in time, products, and extensions.
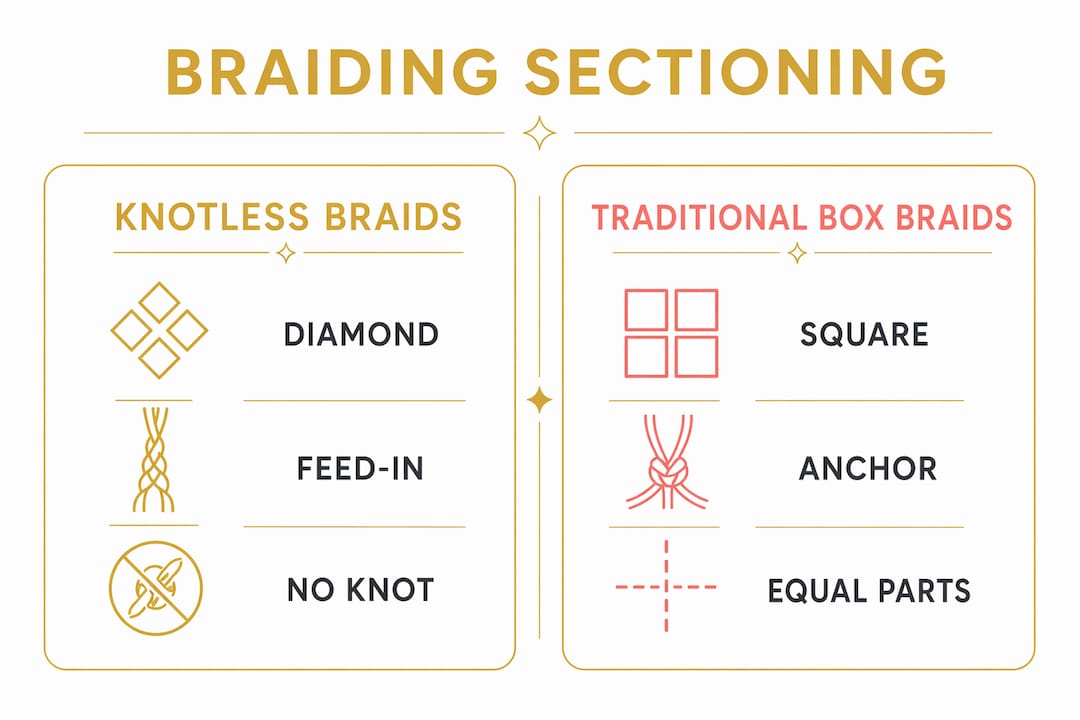
Knotless vs. traditional box braids: how does sectioning differ?
Knotless braids require a fundamentally different sectioning approach than traditional box braids, and understanding that difference protects both your style and your scalp. The two methods share the same geometric grid logic but diverge sharply in how extensions are introduced and how weight is distributed.
Traditional box braids rely on an anchored knot at the root. The stylist creates equal square sections, ties the extension hair at the base, and braids downward. The knot locks everything in place but concentrates tension at the follicle from the first moment. This method is fast and durable, but it demands precise, equal-sized sections to prevent uneven pulling across the scalp.
Knotless braids use a gradual feed-in technique. The stylist starts with your natural hair only, then adds extensions progressively as the braid grows. There is no anchor knot at the root, which means no immediate pulling on the follicle. This approach distributes weight along the length of the braid rather than concentrating it at the base. The result is a more natural appearance and a healthier scalp experience.
| Feature | Knotless Braids | Traditional Box Braids |
|---|---|---|
| Section shape | Square or diamond grid | Square grid |
| Extension method | Gradual feed-in | Anchored knot at root |
| Root tension | Low, distributed | Higher, concentrated |
| Install time | 12+ hours for small sizes | Faster overall |
| Scalp appearance | Flat, natural-looking | Visible knot at base |
Small knotless braids take 12 or more hours to install, partly because the feed-in method requires more precise sectioning at every stage. Very small sections in micro-braids increase the risk of traction alopecia because weight concentrates on fewer follicles. Larger, well-spaced sections at the perimeter reduce that risk significantly.
Pro Tip: For knotless braids, use diamond-shaped sections instead of strict squares. Diamond grids distribute tension more evenly across the scalp and create a more natural-looking part line.
You can explore the full comparison of these two styles in this box braids vs. knotless braids breakdown from Afromagicbraiding.
What tools and techniques ensure perfect sectioning?
Precision sectioning requires the right tools and a clear method before you touch a single strand. Scalp mapping with a rat-tail comb and tension clips improves symmetry and reduces uneven tension, which is the most common cause of braid failure and discomfort. Here is the step-by-step approach professional stylists use:
- Divide the scalp into four quadrants. Part from ear to ear and from forehead to nape. Clip each quadrant separately before working on any individual section. This prevents hair from mixing between zones.
- Map your grid within each quadrant. Use the rat-tail end of your comb to draw clean, straight part lines. Treating the scalp as geometric planes rather than one unit ensures symmetry and protects follicle health.
- Check visual symmetry with a mirror. Hold a hand mirror behind your head and use a standing mirror in front. Asymmetry in sections shows up clearly at this stage and is easy to correct before braiding begins.
- Clip completed sections immediately. Use butterfly clips or duckbill clips to hold finished sections away from your working area. This prevents accidental mixing and keeps tension consistent.
- Apply pre-braid balm before the final section. Work it through mid-lengths and edges to smooth the cuticle, reduce frizz, and give each section a clean, grippy texture that holds through the braid.
Professional stylists mark part lines and check symmetry before finalizing any section because tension distribution problems that appear mid-install are almost impossible to fix without starting over. Prevention at the sectioning stage saves hours of correction later.
Pro Tip: Use a fine-tooth rat-tail comb with a metal tail, not plastic. Metal tails create sharper, more precise part lines that hold their shape as you work through the rest of the install.
How does sectioning protect scalp health during braiding?
Sectioning is the primary tool for protecting your scalp during a braiding install. The way hair is divided directly controls how much tension each follicle absorbs, and that tension determines whether your scalp feels comfortable or painful by day two.
Clients often misattribute scalp discomfort to braid size when the real cause is uneven weight distribution from poor sectioning. A large braid installed over a small, tight section pulls harder on fewer follicles than a medium braid installed over a properly sized section. The braid size is not the problem. The section size is.
Key scalp protection principles tied directly to sectioning technique:
- Larger sections at the perimeter reduce tension on the hairline, where follicles are most fragile and most visible. Traction alopecia most often begins at the temples and edges.
- Consistent section sizing throughout prevents any single follicle cluster from bearing disproportionate weight during 4–8 weeks of wear.
- Geometric grid planning spaces follicle stress evenly across the entire scalp rather than clustering tension in one zone.
- Avoiding overly small sections in micro-braid styles protects against the weight concentration that leads to breakage and follicle damage over time.
Healthy scalp care strategies extend the life of your protective style and support hair growth between installs. Sectioning is the first line of defense, but maintenance through the wear period matters just as much. Learning about tension-free braiding can help you understand how sectioning decisions translate into long-term scalp outcomes.
What common sectioning mistakes should you avoid?
Most braid problems trace back to a small set of repeatable mistakes made during the sectioning stage. Knowing what they are makes them easy to prevent.
- Unequal strand thickness. This is the most common error. When one strand in a three-strand braid is noticeably thicker, the braid twists toward the heavier side and loses uniformity within days.
- Skipping scalp mapping. Starting sections without a grid plan leads to uneven spacing that becomes more obvious as the install progresses. Sections that look close enough at the start look clearly off by the halfway point.
- Sections that are too small at the hairline. Tiny sections along the edges concentrate tension on the most fragile follicles. This is the leading cause of edge thinning in protective styles.
- Sections that are too large in the interior. Oversized interior sections create heavy braids that pull downward and strain the scalp, especially during sleep.
- Braiding damp hair. Moisture at the root causes frizz within hours of installation. Always confirm hair is fully dry at the root before sectioning begins.
Pro Tip: After completing each section, hold it up to the light and compare it visually to the previous section. Your eye catches thickness differences faster than any measuring tool.
Key takeaways
Precise sectioning is the foundation of every long-lasting, healthy, and beautiful braid style, and no amount of skill or product can compensate for poor division at the start.
| Point | Details |
|---|---|
| Sectioning drives braid quality | Uneven sections cause 80% of DIY braid failures through tension imbalance and early frizz. |
| Knotless and box braids differ | Knotless braids use a feed-in method requiring diamond or square grids; box braids use anchored knots with equal square sections. |
| Rat-tail comb and scalp mapping | Dividing the scalp into geometric quadrants before braiding prevents asymmetry and uneven tension. |
| Scalp health starts with section size | Larger perimeter sections protect fragile hairline follicles and reduce traction alopecia risk. |
| Dry hair is non-negotiable | Braiding over damp roots causes mid-section frizz within hours and shortens braid lifespan. |
Why sectioning is the skill most stylists underestimate
I have watched hundreds of installs over the years, and the pattern is always the same. When a client comes in with a braid style that failed early, the conversation starts with the product or the extension hair. It almost never starts with the sections. But when you look closely at the finished style, the evidence is right there: uneven braid thickness, a hairline that looks pulled, sections that drift off-center by the time you reach the nape.
The truth is that sectioning is the hardest part of braiding to teach because it looks simple. You are just dividing hair. But the precision required to maintain consistent strand weight, follow a clean geometric grid, and adjust section size based on where you are on the scalp is genuinely skilled work. It takes repetition to build that muscle memory.
What I have found is that stylists who invest time in their sectioning technique see better client retention than those who focus only on braid speed. A client whose scalp feels comfortable at week four comes back. A client whose edges are thinning does not. That outcome starts at the sectioning stage, not at the finishing stage.
The other thing worth saying: sectioning techniques have evolved alongside braid styles. The feed-in approach used in knotless braids requires a different spatial awareness than traditional box braid sectioning. As styles like Fulani-inspired braids and boho braids grow in popularity, the sectioning demands grow more complex. Stylists who stay current with those techniques are the ones producing work that genuinely honors the craft.
— Afro
Experience flawless braids at Afromagicbraiding
At Afromagicbraiding, every install begins with a precise scalp map and a sectioning plan tailored to your hair type, style choice, and scalp needs. Our stylists in Southfield, Michigan, apply the same tension-controlled techniques described in this article to every client, from classic box braids to intricate knotless styles.

You deserve braids that look exceptional on day one and still look clean at week six. Browse our braid portfolio to see the results that expert sectioning produces, then book your appointment and let us show you what precision looks like in person. Every braid we create is uniquely yours.
FAQ
What is sectioning in braiding?
Sectioning in braiding is the process of dividing hair into organized, evenly sized parts before braiding begins. It controls tension distribution, creates clean part lines, and determines the symmetry and durability of the finished style.
Why does sectioning affect how long braids last?
Uneven sections create tension imbalances that cause frizz and braid unraveling, with poor sectioning linked to 80% of DIY failures. Consistent strand thickness from precise sections keeps braids intact and defined for weeks longer.
How does sectioning differ for knotless braids versus box braids?
Knotless braids use a gradual feed-in technique with no anchor knot at the root, distributing weight along the braid length. Box braids use an anchored knot at the base of equal square sections, concentrating tension at the root from the start.
What tools do you need to section hair for braiding?
A rat-tail comb is the primary tool for drawing clean part lines and mapping the scalp into geometric quadrants. Butterfly clips or duckbill clips hold completed sections in place while you work through the rest of the install.
Can poor sectioning cause hair loss?
Yes. Overly small sections at the hairline concentrate tension on fragile follicles and are a leading cause of traction alopecia. Larger perimeter sections during a 4–8 week protective style significantly reduce that risk.