Box braids are one of the most iconic protective styles in natural hair care, offering weeks of versatility, low daily manipulation, and a look that honors cultural heritage while turning heads. But without the right technique, the experience can go sideways fast: frizz at the roots, scalp soreness from over-tension, and braids that unravel before the week is out. Whether you're attempting your first set at home or looking to better understand what a professional installation involves, this guide walks you through every stage, from gathering your tools to keeping your braids fresh for the full 4 to 8 weeks they're meant to last.
Table of Contents
- Get ready: Tools, materials, and preparation checklist
- Step-by-step: How to braid box braids for beginners
- Avoiding mistakes: Troubleshooting and common errors
- Maintaining box braids: Scalp health, frizz control, and refreshing your style
- Local alternatives: Southfield salons and professional options
- The real secret to box braids: What most tutorials miss
- Ready to transform your look? Connect with Southfield's braiding specialists
- Frequently asked questions
Key Takeaways
| Point | Details |
|---|---|
| Prep and organize | Gather the right tools and detangle your hair to make braiding easier and neater. |
| Use proper technique | Maintain consistent tension and follow the overlap mechanics for secure, lasting box braids. |
| Avoid common mistakes | Watch out for over-tension and frizz; correct errors early to prevent discomfort and hair damage. |
| Maintain and refresh | Cleanse, moisturize, and protect your box braids to keep them looking fresh for up to 8 weeks. |
| Professional help available | Local Southfield salons provide expert styling and maintenance for those who prefer professional results. |
Get ready: Tools, materials, and preparation checklist
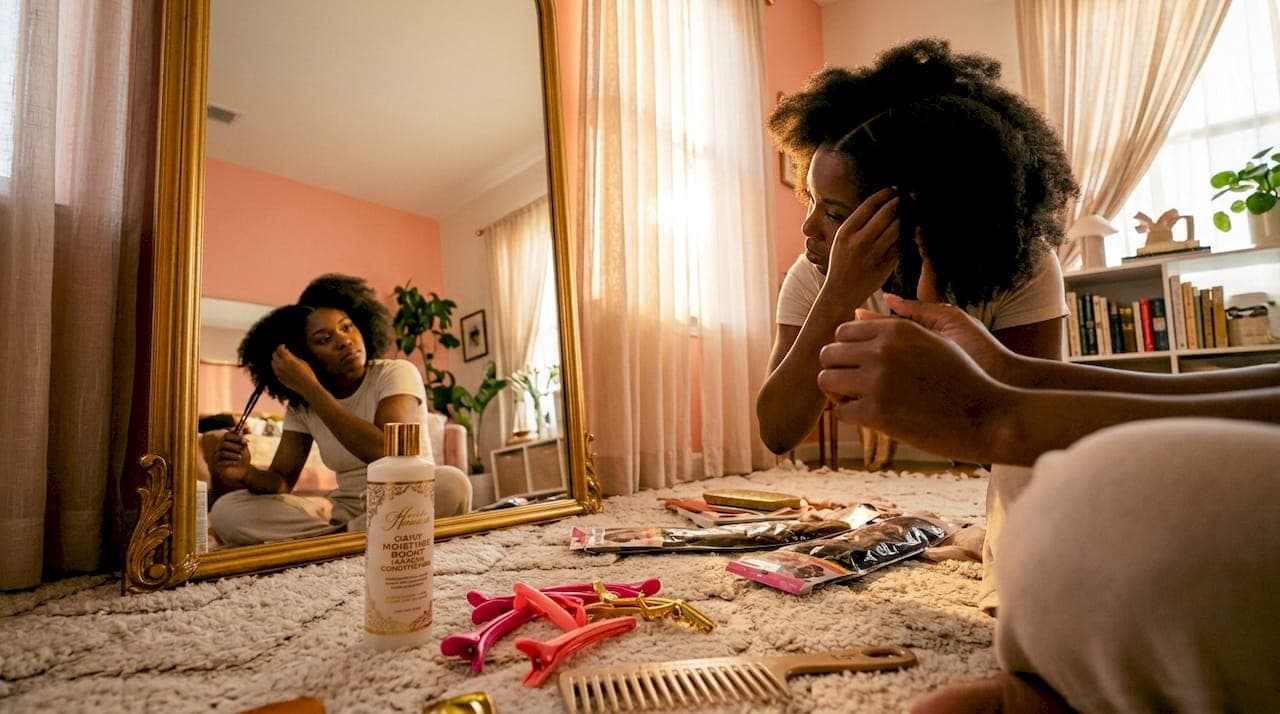
With the basics covered, let's make sure you have everything you need to start box braids comfortably. Rushing into installation without the right supplies is one of the most common reasons beginners end up frustrated halfway through.
Essential tools you'll need:
- Rat-tail comb (for clean, precise parting)
- Butterfly clips or sectioning clips
- Braiding hair extensions (kanekalon is most common)
- A quality detangling product to prep your natural hair
- Edge control gel
- A handheld mirror or double mirror setup
- Sharp scissors for trimming ends
- Spray bottle with water for moisture
Preparation matters just as much as the braiding itself. Start by washing your hair thoroughly and following up with a deep conditioner. Clean, moisturized hair grips extensions better and reduces frizz from day one. Once your hair is dry, use your rat-tail comb to detangle in small sections, working from ends to roots to minimize breakage.
For beginners,
is the most manageable approach. You section the hair horizontally from the nape upward, completing each row before moving to the next. This method keeps your parts neat and prevents the overwhelm of trying to manage the entire head at once.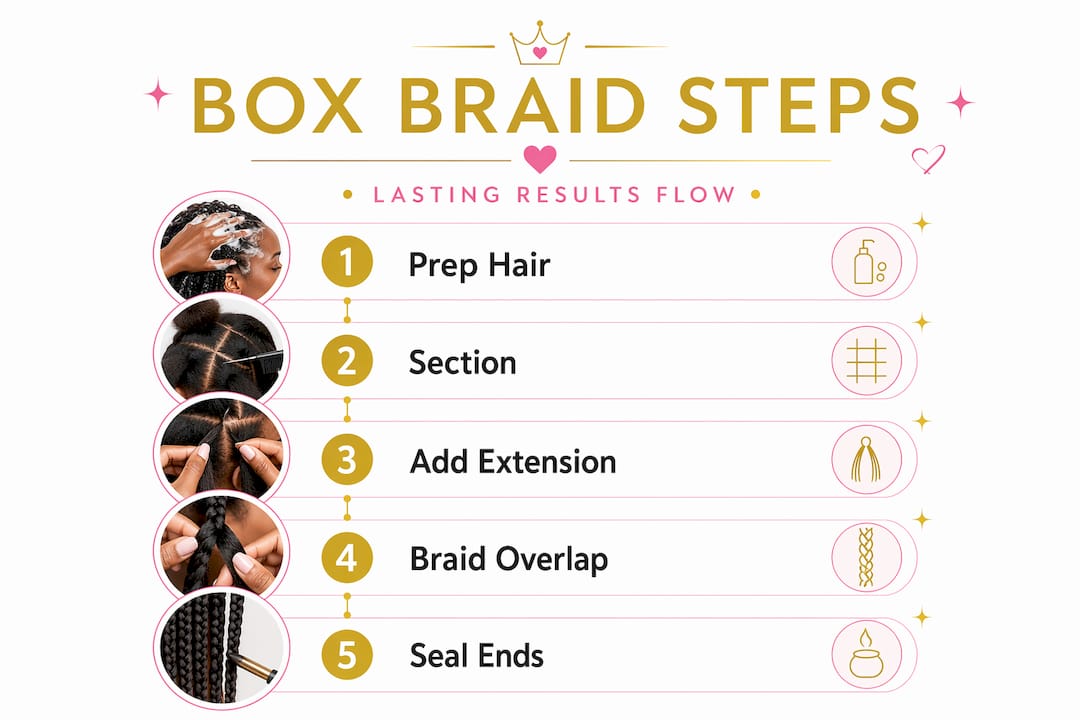
Regular box braids vs. boho-style braids: material comparison
| Feature | Regular box braids | Boho box braids |
|---|---|---|
| Extension type | Kanekalon braiding hair | Kanekalon + wavy/curly hair |
| Texture at ends | Smooth, sealed | Wavy or curly, loose |
| Installation time | 4 to 8 hours | 5 to 10 hours |
| Maintenance level | Moderate | Moderate to high |
| Style versatility | High | Very high |
| Best for | Clean, classic look | Soft, textured aesthetic |
Boho styles require a second type of hair, usually a wavy bundle that gets looped into the braid partway through the installation. If you're browsing styles for inspiration, our braiding gallery shows both looks in full detail. And if you'd rather leave it to the pros, our braiding services cover everything from classic to boho and beyond.
Step-by-step: How to braid box braids for beginners
Once you're organized and prepped, follow these steps to achieve professional-looking box braids.
-
Part your first row. Starting at the nape, use your rat-tail comb to draw a clean horizontal part. Clip everything above it out of the way.
-
Create your first box section. Within that row, part a small square (or box) of hair. The size of the box determines the thickness of the braid. Smaller boxes equal thinner braids and more installation time.
-
Prepare your extension hair. Fold a piece of braiding hair in half. Hold the fold against the root of your natural hair section, letting both sides of the extension hang down alongside your natural strands.
-
Begin the three-strand braid. Divide the combined natural hair and extension into three sections. Cross the right section over the middle, then the left section over the new middle. Repeat, maintaining consistent tension throughout.
-
Feed in more extension hair as needed. For longer or thicker braids, you can add small amounts of extension hair as you braid downward. This is the feed-in technique, and it creates a more gradual, natural-looking thickness.
-
Braid to the desired length. Continue the three-strand pattern all the way to the end of the extension hair.
-
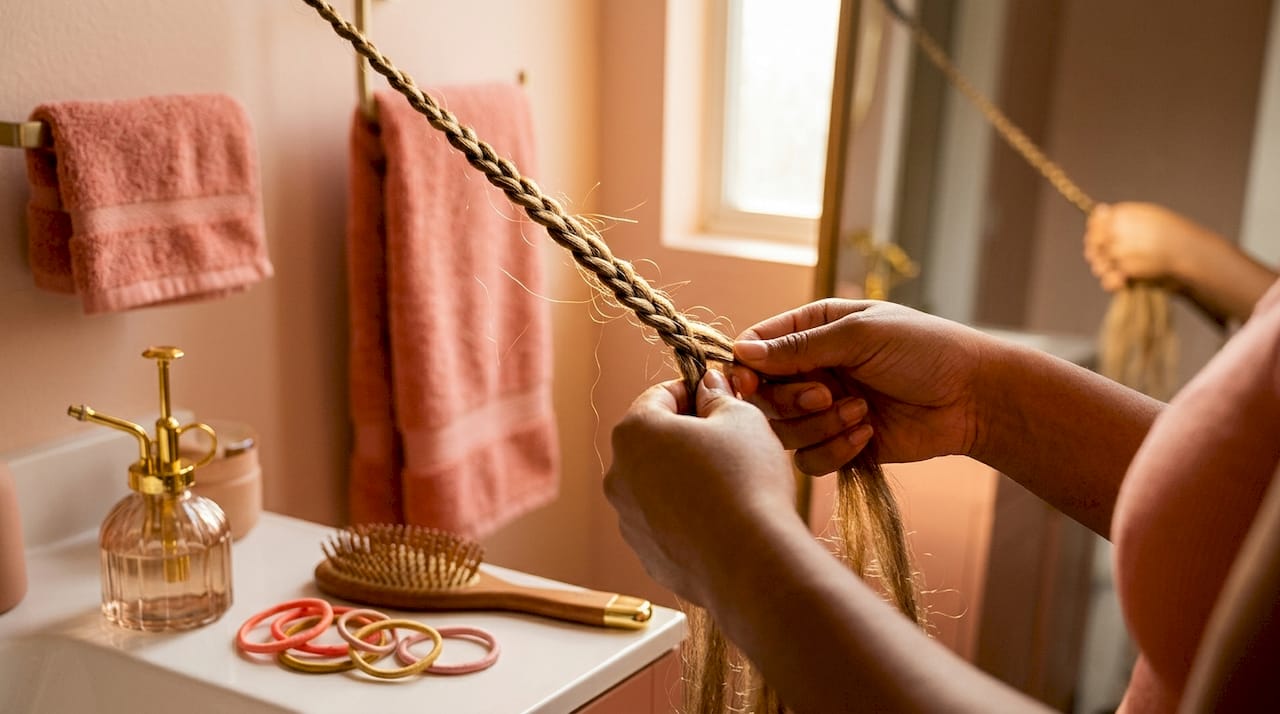
Seal the ends. Dip the ends briefly in hot water (for kanekalon) or use a lighter to carefully seal them. Hot water sealing is safer and more beginner-friendly.
-
Repeat across the entire head. Work row by row, moving upward from the nape to the crown.
Pro Tip: Keep a small spray bottle nearby. Lightly misting your natural hair before attaching the extension helps the hair grip better and reduces frizz at the root.
The braid-overlap mechanics (right and left sections crossing over the middle) are what build a secure, tight braid. Inconsistent crossing, like switching from over to under mid-braid, creates weak spots that unravel quickly. Consistency is everything.
| Braid size | Box section size | Approximate braid count | Installation time |
|---|---|---|---|
| Micro | 0.5 x 0.5 inches | 150 to 200+ | 8 to 12 hours |
| Small | 1 x 1 inch | 80 to 100 | 6 to 8 hours |
| Medium | 1.5 x 1.5 inches | 40 to 60 | 4 to 6 hours |
| Large/jumbo | 2 x 2 inches | 20 to 30 | 2 to 4 hours |
For visual references and style ideas to guide your installation, check out our starter techniques portfolio for inspiration.
Avoiding mistakes: Troubleshooting and common errors
Even with careful braiding, mistakes and discomfort can happen. Here's how to catch and correct them early.
Common errors and how to fix them:
- Over-tension at the root: This is the most damaging mistake. Braiding too tightly creates bumps at the scalp, headaches, and over time, traction alopecia (hair loss along the hairline). If your scalp is visibly bumpy or white at the root, the braid is too tight. Redo it with a gentler grip.
- Loose braids that unravel: Usually caused by inconsistent tension or not enough extension hair at the start. Re-braid the section from the root, adding slightly more extension hair and maintaining even pressure throughout.
- Frizz at the roots: Happens when the natural hair isn't fully incorporated into the extension at the base. Smooth the root before braiding, and make sure the fold of the extension is seated right at the scalp.
- Unfinished or unraveling ends: Seal ends properly with hot water or a brief flame pass. If an end unravels days later, re-dip it in hot water to re-seal.
- Uneven parts: Use a fine-tooth rat-tail comb and take your time. Rushing the parting stage shows in the final result.
Tension is a critical control knob in box braids. Over-tension and leaving braids in too long both contribute to scalp discomfort and edge damage. These aren't minor inconveniences; they can set back your hair health significantly.
"The goal isn't just a beautiful braid. It's a braid that protects your hair and honors your scalp. Every braid tells a story, and we want yours to be one of health and confidence." — Afro Magic Braiding
Box braids are typically worn for 4 to 8 weeks, and pushing past that window increases the risk of matting, buildup, and hairline stress. Mark your calendar when you install and plan your removal accordingly.
Pro Tip: If your scalp feels sore in the first 48 hours after installation, apply a lightweight scalp care oil to soothe inflammation. Soreness that lasts beyond three days is a sign the braids may be too tight and should be redone.
If you're unsure whether your braids are causing damage, our client reviews share real experiences from clients who've navigated these exact concerns. You can also reach us directly through our contact page for personalized advice.
Maintaining box braids: Scalp health, frizz control, and refreshing your style
To extend the life of your box braids and keep your scalp comfortable, follow these easy maintenance routines.
Weekly maintenance checklist:
- Cleanse your scalp every 1 to 2 weeks using a diluted sulfate-free shampoo or a scalp-specific cleanser. Apply it directly to the scalp in sections and rinse thoroughly.
- Apply a lightweight scalp moisturizer after each cleanse to keep the scalp hydrated and reduce itching.
- Use a light oil (jojoba, tea tree, or peppermint) to massage the scalp between wash days. This stimulates circulation and keeps the scalp from drying out.
- Sleep with a silk or satin bonnet every night. This single habit dramatically reduces frizz, prevents lint buildup, and keeps your edges smooth.
- Avoid heavy products that coat the braids and attract lint. Less is more when it comes to product application on the braids themselves.
Controlling frizz between washes:
Frizz is the number one complaint from box braid wearers, and it's almost always preventable. The key is cleansing gently and re-moisturizing while braids are slightly damp, rather than waiting until hair is completely dry. A light spritz of water mixed with a leave-in conditioner smooths the cuticle and tames flyaways without weighing the braids down.
For a mid-week refresh, lightly mist your roots and smooth them with a soft-bristle brush or your fingertips. This reactivates any product already in the hair and lays down frizz without adding buildup.
How long should you keep box braids in?
The 4 to 8 week wear window is a guideline, not a suggestion. Wearing braids beyond 8 weeks creates a serious risk of matting at the root, where new growth tangles with the extension hair. Removing matted braids without causing breakage is difficult and sometimes impossible without cutting. Stick to the window, and your hair will thank you.
For fresh style ideas to plan your next set, browse our braid inspiration gallery and start dreaming up your next look.
Local alternatives: Southfield salons and professional options
If DIY feels overwhelming or you're craving professional precision, Southfield offers expert braiders and salons ready to help.
There's a real difference between a home install and a professional one. It's not just about neatness, though that matters too. A skilled braider works faster, maintains consistent tension throughout, and can spot and address scalp concerns in real time. For a full head of medium box braids, a professional can often complete the install in half the time it takes a beginner working alone.
DIY vs. professional installation: a quick comparison
| Factor | DIY at home | Professional salon |
|---|---|---|
| Time to complete | 6 to 12 hours | 3 to 6 hours |
| Tension consistency | Variable | High |
| Parting precision | Moderate | Very high |
| Scalp assessment | None | Included |
| Cost | Low (materials only) | Moderate to high |
| Ideal for | Experienced or patient beginners | All experience levels |
The Southfield and greater Detroit area has a strong community of professional braiders. Local salons in the area have built solid reputations through consistent reviews and repeat clients, making it easier than ever to find a trusted stylist close to home.
Tips for choosing a professional braider:
- Look for a portfolio with a range of styles, not just one type of braid
- Read reviews that specifically mention tension, scalp care, and longevity of the style
- Ask about the hair products they use and whether they source quality extensions
- Confirm they offer a consultation before booking, especially for first-time clients
Our professional services at Afro Magic Braiding are designed with all of this in mind, from the quality of our extensions to the care we take with every part and every braid.
The real secret to box braids: What most tutorials miss
Most tutorials do a solid job of walking you through the mechanics. Fold the hair, cross the sections, seal the ends. But what they rarely address is the feel of the braid as it forms under your hands. Real mastery in braiding isn't about memorizing steps. It's about developing sensitivity to tension, adjusting your grip based on the texture and density of each section, and knowing when to ease up before damage occurs.
Every client's hair is different. Fine 4C hair needs a lighter touch than thicker 4B strands. The nape requires less tension than the crown. These aren't rules you can read in a list. They're lessons learned through practice, feedback, and, ideally, guidance from someone who's installed hundreds of sets.
Here's the uncomfortable truth: most scalp and hairline damage from box braids doesn't come from a single bad install. It comes from repeated installs that are slightly too tight, over and over, until the follicles weaken. By the time you notice thinning edges, the damage has been building for months. This is why maintenance and professional consultation aren't luxuries. They're part of responsible protective styling.
We also believe that local salons are underused as a resource. Many clients visit once for an install and don't return until something goes wrong. But a good braider is also an advisor. They can look at your hairline, assess your scalp health, and tell you whether your current routine is working. That relationship, built over time, is one of the most valuable tools in your hair care toolkit. Browse our braiding inspiration to see what's possible when skill, care, and cultural pride come together in every braid.
Ready to transform your look? Connect with Southfield's braiding specialists
Now that you're equipped with the how-to and insider tips, take the next step by connecting with professionals in your area.
At Afro Magic Braiding, we bring expertise, cultural pride, and genuine care to every client who sits in our chair. Whether you're inspired by a style you saw online or you're ready to try something entirely new, our team is here to make it happen.

Browse our portfolio of braided styles to find the look that speaks to you, then book an appointment to get started. From classic medium box braids to intricate boho styles, we're ready to transform your hair into art, one braid at a time. We serve clients throughout Southfield and the surrounding metro Detroit area, and we'd love to welcome you into our community.
Frequently asked questions
How long does it take to do box braids yourself?
Box braids typically take 4 to 8 hours depending on braid size and your skill level, with micro braids potentially taking 10 to 12 hours for beginners. Planning the installation time across two days can make the process more manageable.
What can I do if my scalp gets sore during or after braiding?
Reduce tension immediately, apply a soothing scalp oil, and avoid pulling or styling the braids tightly. Over-tension causes discomfort and edge damage, so persistent soreness beyond 48 hours should be evaluated by a professional braider.
How often should I wash my box braids?
Wash box braids every 1 to 2 weeks using a diluted, sulfate-free shampoo applied directly to the scalp. Cleansing gently and re-moisturizing while hair is slightly damp keeps both the scalp and the braids in good condition.
How do I keep my box braids looking fresh between salon visits?
Lightly mist your roots, apply a small amount of leave-in conditioner, and always protect your braids at night with silk or satin. Nighttime protection and re-moisturizing are the two simplest habits that make the biggest difference in how long your braids look neat.
What are some signs it's time to remove box braids?
Excessive frizz at the root, visible product buildup, scalp discomfort, or new growth that's matting into the extension hair are all clear signals. The 4 to 8 week guideline exists to protect your edges and follicles, so don't push past it without a professional assessment.
Recommended
- Best Hair Braiding in Southfield Michigan | Afro Magic Braiding Hair - Knotless Braids Southfield
- Best Hair Braiding in Southfield Michigan | Afro Magic Braiding Hair - Knotless Braids Southfield
- Best Hair Braiding in Southfield Michigan | Afro Magic Braiding Hair - Knotless Braids Southfield
- Best Hair Braiding in Southfield Michigan | Afro Magic Braiding Hair - Knotless Braids Southfield