Parting in braids is defined as the strategic division of hair into precise, organized sections that serve as the blueprint for every braid installed. The role of parting in braids reaches far beyond simple organization. It determines braid symmetry, scalp visibility, tension distribution, and how long your style actually lasts. Clean, intentional sectioning is what separates a polished, salon-quality install from one that looks rushed within a week. Whether you are learning to braid at home or preparing for your next appointment, understanding parting technique is the single most impactful skill you can develop.
What is the role of parting in braids?
Parting is the invisible architecture beneath every braid style. Before a single strand is crossed, the sections you create determine how uniform, full, and clean the finished look will be. Failure to maintain consistent parts leads to uneven braid sizes and an unprofessional appearance, even when the braiding technique itself is flawless. That is why professional stylists treat pre-parting as a non-negotiable foundation, not an afterthought.
The industry term for this process is sectioning, and it encompasses both the pattern you use and the size of each individual section. Every decision you make at the parting stage ripples through the entire style. Sections that are too large create bulky, uneven braids. Sections that are inconsistent create a patchy scalp appearance that no amount of styling can fix. Getting the sectioning right from the start protects both your look and your hair health.
How do different parting techniques shape braid aesthetics?
The parting pattern you choose is the most defining element of your braid style's final aesthetic. Clients should view parts as design opportunities, not just practical necessities. Each technique produces a distinct visual result and serves a different purpose.
Here is a breakdown of the most common parting methods:
- Square parting: The classic grid pattern. Sections are cut in straight horizontal and vertical lines, creating a uniform, structured look. Best for box braids and knotless braids where clean scalp lines are desired.
- Brick-lay parting: Sections are staggered like bricks in a wall. This pattern prevents patchy looks in jumbo braids by distributing hair more evenly across the scalp.
- Triangular parting: Sections are cut in triangular shapes, adding a geometric, fashion-forward element to the style. Fulani-inspired braids and tribal styles often use this technique.
- Free parting: No rigid grid is drawn. Instead, sections are taken organically as you braid. Free parting staggers parts to avoid straight scalp lines, creating a natural, full appearance that works well for beginners.
- Diamond parting: A variation of square parting rotated 45 degrees. It creates a distinctive scalp pattern and is popular for knotless braids with a high-fashion finish.
| Parting type | Visual effect | Best for | Key advantage |
|---|---|---|---|
| Square | Structured, uniform | Box braids, knotless braids | Clean scalp lines |
| Brick-lay | Even, no patches | Jumbo braids | Hides scalp gaps |
| Triangular | Geometric, bold | Tribal, Fulani styles | Fashion-forward look |
| Free parting | Natural, full | Beginners, DIY installs | Reduces extension hair needed |
| Diamond | Distinctive, elevated | Knotless braids | High-fashion scalp pattern |
Pro Tip: Free parting is a strategic technique that creates a natural, full look and reduces the amount of extension hair required per braid. If you are doing a self-install for the first time, free parting gives you more flexibility without sacrificing neatness.

Does part size actually affect how braids look?
Part size and braid thickness are directly linked. A small section produces a thin braid. A large section produces a thick braid. The relationship sounds simple, but the real skill is in mapping your sections so the size stays consistent from the hairline to the nape.
Consistency in part sizing affects a professional finish more than exact measurements. Smaller parts near the perimeter create a detailed, polished look, while larger parts at the crown maintain fullness and reduce install time. This mapping strategy is used by professional braiders to create styles that look intentional and balanced from every angle.
Here is a four-step approach to planning your part sizes effectively:
- Decide your braid size first. Choose jumbo, large, medium, small, or extra-small before you touch a comb. Your part size follows from that decision.
- Map the perimeter separately. Use smaller sections along the hairline and edges. This creates a detailed, finished frame around the face without adding bulk.
- Use larger sections at the crown. The crown carries the most hair volume. Larger sections here maintain fullness and prevent the top of the style from looking flat.
- Measure by eye, not ruler. Hold your rat-tail comb horizontally and use the width of the comb tip as a consistent guide. This keeps sections uniform without slowing you down.
Many people request "medium" or "small" braids without realizing that part mapping and hair density are the real factors influencing final visual fullness. The amount of extension hair fed into each braid, combined with part size, determines the true visual size. Braid count alone tells you very little.
Pro Tip: Before your appointment, bring a reference photo that shows the scalp pattern you want, not just the braid length or color. This gives your stylist a clear target for both part size and pattern.
How does proper parting support hair health?
Clean parting is one of the most powerful protective styling tools you have. When sections are drawn precisely, tension is distributed evenly across the scalp. Uneven sections concentrate pulling force on specific follicles, which leads to breakage and thinning over time, especially along the edges and nape.
Maintaining clear, crisp parting lines requires gentle nightly care, protective wrapping, and avoiding heavy product-laden styles that cause frizz and buildup at the braid base. These habits extend style longevity and keep the scalp healthy between installs. Pair these practices with a solid scalp care routine to protect your follicles throughout the wear period.
Key maintenance habits that protect your parts:
- Wrap your hair nightly with a satin scarf or bonnet. This reduces friction and keeps the braid bases from frizzing out.
- Apply lightweight scalp oil along the part lines every few days. Jojoba oil and tea tree oil work well for keeping the scalp moisturized without buildup.
- Avoid heavy gels at the roots. Product buildup along part lines causes flaking and weakens the hair shaft at the base of each braid.
- Do not re-braid edges too tightly. The nape and temple sections are the most vulnerable. Clients often overlook the nape section in parting consistency, but it is critical for a professional finish and long-term hair health.
For a full breakdown of care routines that keep your braids looking fresh, the braid maintenance guide at Afromagicbraiding covers everything from moisturizing schedules to protective wrapping techniques.
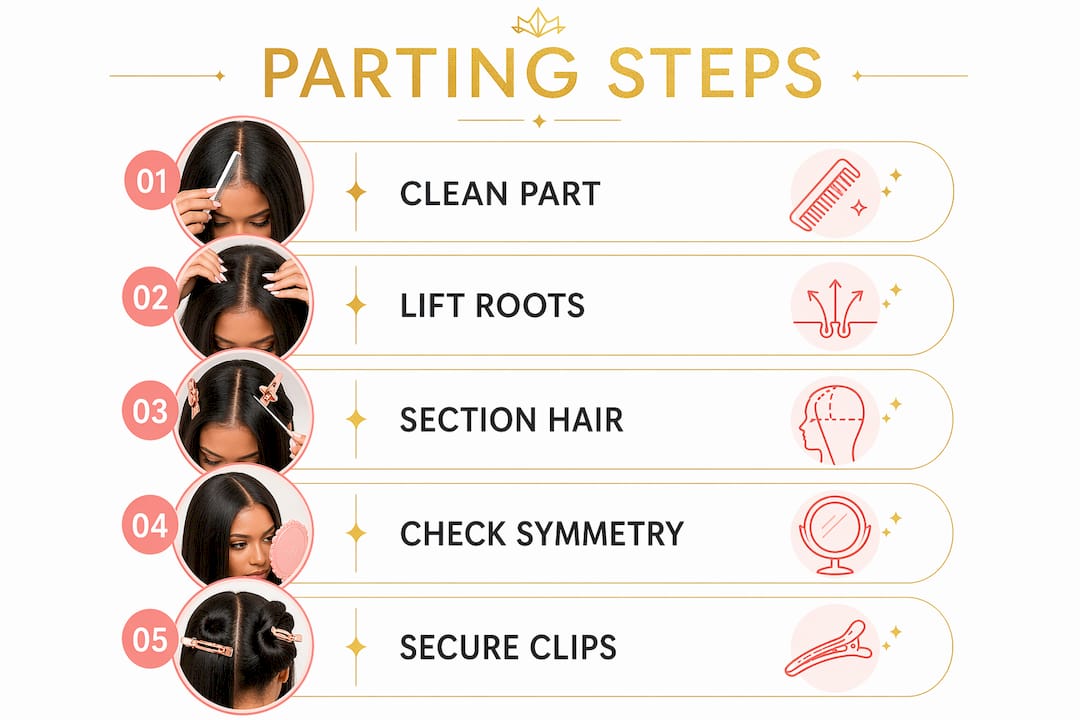
How to part hair for braids: a step-by-step guide
Pre-parting your entire head before braiding begins is the professional standard. Braiders call this the "assembly line" approach. It reduces appointment time, prevents uneven sections, and gives you a clear visual map of the full style before a single braid is started.
Follow these steps for clean, consistent results:
- Start from the back. Starting from the back ensures control over the hardest-to-see areas first. Sections at the nape are the most difficult to correct later, so tackling them while your focus is fresh prevents problems.
- Detangle completely before sectioning. Knots and tangles distort section shapes. Work through the hair with a wide-tooth comb before picking up your rat-tail comb for parting.
- Use a rat-tail comb for precision. The pointed end creates clean, straight lines. Avoid using your fingers alone for sectioning, as this creates irregular shapes.
- Clip each section immediately after parting. Use butterfly clips or sectioning clips to secure each part as you go. This prevents sections from merging back together before you are ready to braid.
- Work in horizontal rows. Part one full row across the back, clip it, then move up. This keeps your pattern consistent and prevents you from losing your place.
- Check symmetry before braiding. Step back and look at the full head from above. Uneven rows are much easier to fix at this stage than after braiding has begun.
Pro Tip: Strategically lifting the roots at the part line while braiding can add architectural lift and visual drama to the style. This technique works especially well with big-part box braids and Fulani-inspired styles.
Common mistakes to avoid: skipping the back section until last, using sections that are too wide at the perimeter, and failing to clip sections before moving on. Each of these creates a cascade of corrections that slow down the install and compromise the final look. For a deeper walkthrough of the full installation process, the step-by-step box braids guide at Afromagicbraiding walks you through every stage.
Key takeaways
Parting is the single most impactful technical decision in any braid install, directly controlling symmetry, tension, scalp health, and how long the style holds its shape.
| Point | Details |
|---|---|
| Parting defines the final look | The sectioning pattern shapes braid symmetry, scalp visibility, and overall style balance. |
| Match part size to braid thickness | Smaller perimeter sections and larger crown sections create a polished, proportional result. |
| Pattern choice affects hair health | Even tension distribution from clean parts reduces breakage and protects follicles over time. |
| Start from the back | Pre-parting from the nape forward prevents uneven sections in the hardest-to-see areas. |
| Maintenance preserves part lines | Nightly wrapping and lightweight scalp oil keep braid bases clean and extend style longevity. |
Why parting is the skill most people underestimate
I have seen it hundreds of times. A client sits down with a reference photo of a flawless style, and the first question is always about braid length or hair color. Almost no one asks about the parting pattern. That gap in awareness is exactly where most braid installs fall short.
The truth is that a mediocre braid technique on top of perfect parting will look better than a skilled braid technique on top of chaotic sections. Parts are the foundation. Everything else is built on them. When I look at a finished style that feels "off" but I cannot immediately identify why, nine times out of ten the problem traces back to inconsistent sections at the start.
What I tell every client who wants to learn to braid at home: spend twice as long on your pre-parting as you think you need to. The braiding itself will go faster, the result will look more professional, and your hair will thank you for the even tension distribution. Parting is not the glamorous part of the process. But it is the part that makes every braid tell a cleaner, more beautiful story.
— Afro
Ready to see expert parting in action?
At Afromagicbraiding, every install starts with a precise pre-parting plan tailored to your hair density, desired braid size, and style goals. Our stylists in Southfield, Michigan bring years of experience to every section, every row, and every braid.

Browse our braid style portfolio to see how clean parting transforms a style from ordinary to exceptional. When you are ready to book, our appointment page makes scheduling simple. You can also explore our blog for tutorials, healthy braid tips, and maintenance guides to keep your style looking its best between visits.
FAQ
What does parting do for box braids specifically?
In box braids, the parting pattern determines scalp visibility, braid uniformity, and how long the style holds its shape. Clean, consistent sections are what give box braids their signature structured appearance.
What is the best parting pattern for beginners?
Free parting is the best starting point for beginners. It creates a natural, full look without requiring a precise grid, and it reduces the amount of extension hair needed per braid.
How does part size affect braid fullness?
Smaller sections create thinner, more detailed braids, while larger sections produce fuller, thicker braids. Mapping smaller parts at the perimeter and larger parts at the crown creates a balanced, proportional style.
Can bad parting damage your hair?
Yes. Uneven sections concentrate tension on specific follicles, which leads to breakage over time. Clean, even parting distributes tension across the scalp and is a core principle of protective styling.
How do you keep parting lines clean during wear?
Wrap your hair nightly with a satin scarf, apply lightweight scalp oil along the part lines every few days, and avoid heavy gels at the braid roots. These habits preserve part line clarity and extend your style's lifespan.