
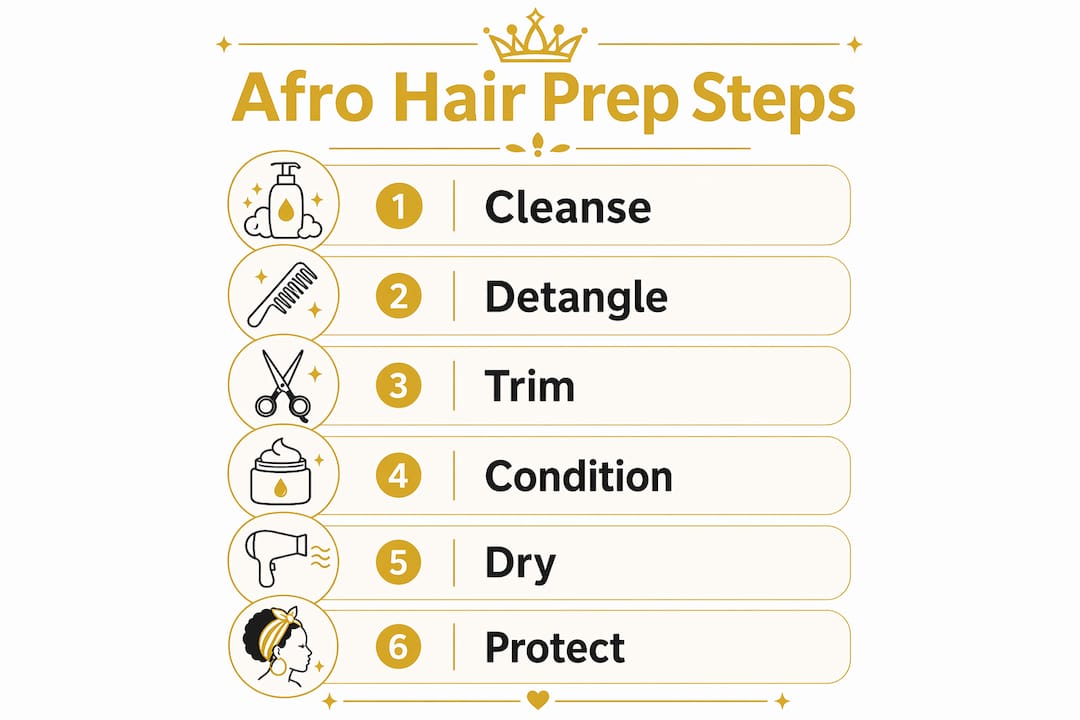
Afro hair care before braiding is the process of preparing natural hair through cleansing, detangling, conditioning, and moisturizing to create a healthy foundation for a durable, damage-free style. Skipping this routine is the most common reason braids cause breakage, scalp irritation, and premature frizz. The Style Serum and Black Beauty Basics both confirm that a proper pre-braiding hair routine covers five core steps: scalp reset, detangling, deep conditioning, moisture locking, and thorough drying. Get these right, and your protective style will look better and last longer.
Why afro hair care before braiding starts with a clean scalp
A clean scalp is the non-negotiable starting point for any braid installation. Product buildup, excess oil, and environmental debris sit on the scalp and weaken the foundation your braids rest on. Left in place, that buildup causes itching, flaking, and can shorten the life of your style.
The Style Serum recommends a complete scalp reset 4–8 weeks before braiding using a clarifying shampoo or scalp scrub, followed by a protein treatment to strengthen the hair shaft. That timeline matters because braids are typically kept for 4–8 weeks, so you want your scalp in peak condition at the start.
Here is how to approach your cleansing step:
- Clarifying shampoo: Use once to strip buildup before your braid appointment. Do not use it every wash, as it can strip natural oils.
- Scalp scrub: A gentle exfoliating scrub removes dead skin cells and unclogs follicles. Apply with fingertips, not nails.
- Protein treatment: Apply after clarifying to rebuild any weakened areas of the hair shaft. Leave on for the time listed on the product.
- Moisturizing shampoo: Follow up with a sulfate-free, moisturizing shampoo to restore softness after the clarifying step.
- Avoid overwashing: Do not wash your hair the day of your appointment. Freshly washed hair can be too slippery for a stylist to maintain consistent tension.
Pro Tip: Wash your hair 24–48 hours before your appointment. This gives your scalp time to rebalance its natural oils, which improves grip and makes sectioning far more precise.
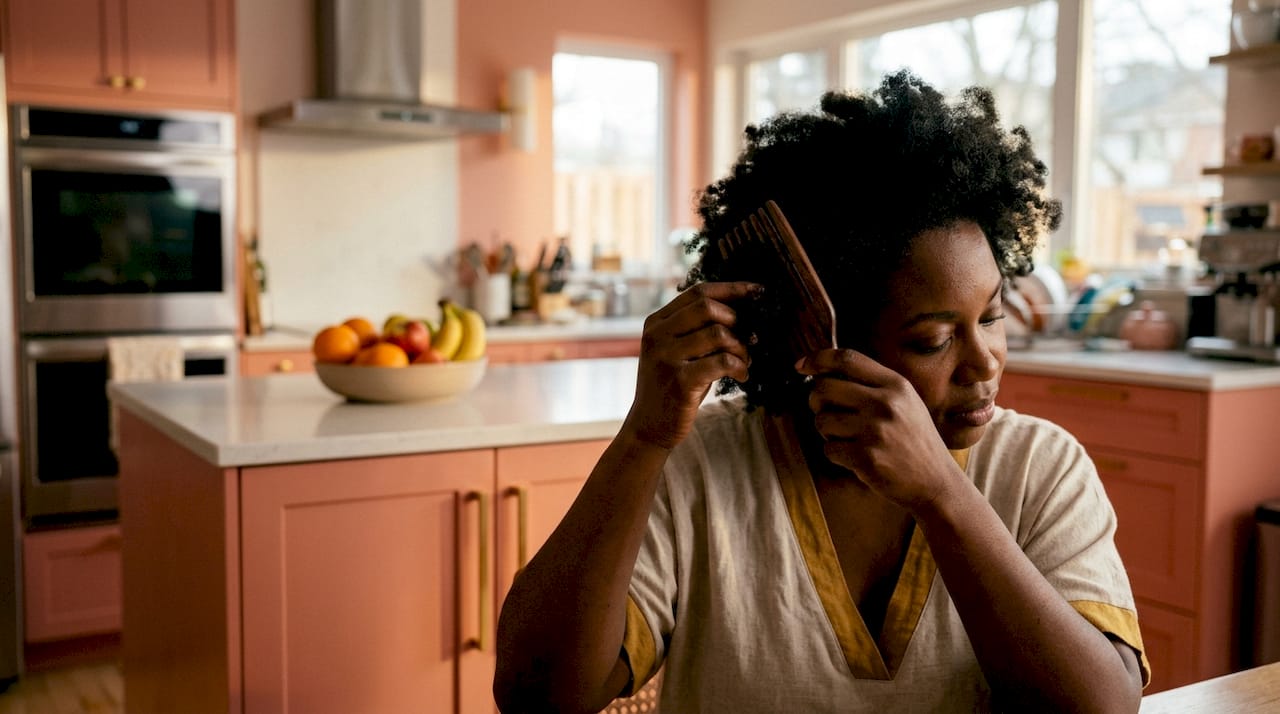
How do you detangle and trim hair for braid readiness?
Detangling is the step most people rush, and it is the one that causes the most damage. Detangling before hair gets wet prevents fairy knots, reduces shedding, and makes both washing and braiding easier on your strands. Wet hair is more fragile, so working through tangles on dry hair first protects the cuticle.
Follow this sequence for a thorough, low-damage detangle:
- Apply a detangling product. Use a lightweight detangling spray or a few drops of jojoba or grapeseed oil to add slip before you start.
- Divide hair into four sections. Clip each section away and work one at a time. Smaller sections give you more control and reduce pulling.
- Start from the ends. Work your wide-tooth comb or fingers from the tips upward toward the root. Never drag from root to tip.
- Remove shed hair as you go. This prevents it from tangling back into healthy strands.
- Check for fairy knots. Gently separate any small knots with your fingers rather than forcing a comb through them.
Trimming split ends 2–3 days before your appointment is equally important. Split ends travel up the shaft during a protective style, causing breakage mid-braid. A small trim before installation protects the length you are working to keep. That 2–3 day window also gives your nourishing products time to absorb into freshly trimmed ends before the braids go in.
Pro Tip: Detangle in a well-lit area so you can spot knots and fairy knots clearly. Good lighting saves your ends.
Deep conditioning and moisturizing strategies to strengthen hair pre-braiding
Deep conditioning is the most powerful thing you can do for your hair before a protective style. Deep conditioning infuses hydration, improves elasticity, and makes hair more pliable, which directly reduces breakage during braiding. Hair under tension needs every bit of flexibility it can get.
Here is what a strong deep conditioning routine looks like:
- Choose a moisturizing deep conditioner with ingredients like shea butter, argan oil, or aloe vera. These penetrate the cortex rather than just coating the strand.
- Leave it on for 15–30 minutes. Shorter times do not allow full penetration. Use a heat cap or steamer to boost absorption significantly.
- Rinse with cool water. Cool water seals the cuticle after conditioning, locking in the moisture you just added.
- Follow the LOC or LCO method. LOC stands for leave-in conditioner, oil, and cream applied in that order to seal moisture in layers. LCO reverses the oil and cream steps, which works better for high-porosity hair.
- Pay extra attention to your ends. Ends are the oldest, driest part of your hair and the most vulnerable to breakage under braid tension.
Hair porosity determines how much moisture your hair absorbs and retains. Low-porosity hair benefits from heat during conditioning to open the cuticle. High-porosity hair absorbs moisture fast but loses it just as quickly, so a heavier cream in the final LOC step helps seal it in. Knowing your porosity lets you pick products that actually work for your hair type rather than guessing.
Pro Tip: Apply your deep conditioner in sections and use a wide-tooth comb to distribute it evenly from root to tip. Uneven application means uneven moisture, and that shows up as inconsistent braid texture.
Why does hair need to be completely dry before braiding?
Hair must be 100% dry before braiding, and this is one of the most overlooked rules in the pre-braid process. Braiding damp hair causes hygral fatigue and mid-section frizz, a condition where repeated swelling and contracting of the hair shaft weakens its structure over time. Moisture trapped inside a braid also creates the right conditions for mildew and scalp irritation.
Remaining moisture at the roots typically results in visible frizz within 2 hours of installation. That means a style you spent hours on can look undone before you even leave the salon. Fully dry roots also give your stylist better grip, which means cleaner sections and more even tension throughout.
Here is how to dry your hair correctly before your appointment:
- Blow-dry in sections. Blow-drying section by section, rather than all at once, ensures every layer of hair dries fully, including the underlayers closest to the scalp.
- Use a heat protectant. Apply a lightweight heat protectant spray before blow-drying to shield the cuticle from direct heat damage.
- Check the roots last. Roots retain moisture longer than ends. Run your fingers along the scalp after drying to confirm no damp spots remain.
- Air-dry as a supplement, not a replacement. Air-drying alone often leaves roots damp, especially for thick or dense hair. Use it to start the process, then finish with a blow-dryer.
Pro Tip: Schedule your wash day 24–48 hours before your braiding appointment. Washing hair the day before gives scalp oils time to rebalance, which improves stylist grip and reduces slippage during installation.
How to use styling products without causing buildup or breakage
Product selection before braiding is about balance. You want enough moisture and slip to protect your strands, but not so much product that your hair becomes too slippery for your stylist to work with. Heavy greases and excess oils before braiding impair tension control and lead to flaking and buildup inside the braid. That buildup is hard to clean without removing the style entirely.
Follow these guidelines when choosing and applying your pre-braid products:
- Choose lightweight leave-in conditioners. Look for water-based formulas rather than thick creams. They add moisture without weighing hair down or creating residue.
- Use oils sparingly. Lightweight oils like jojoba, grapeseed, or sweet almond oil work well. Apply a dime-sized amount to your palms and distribute through the hair, focusing on ends.
- Skip heavy petroleum greases. These sit on the hair surface, block moisture, and make it difficult for a stylist to maintain clean, even tension.
- Apply braid balm to edges only. A small amount of braid balm on the hairline smooths baby hairs and reduces tension on the most fragile part of your hairline.
- Even sectioning starts with product balance. Hair that is evenly moisturized, not overloaded, allows for clean, even sectioning that reduces pulling and improves braid durability.
The goal is hair that feels soft, manageable, and lightly conditioned. If your fingers slide through without any resistance, you have used too much product. A light grip with smooth movement is exactly what your stylist needs to deliver a neat, long-lasting style.
Key Takeaways
Proper afro hair care before braiding requires cleansing, detangling, deep conditioning, thorough drying, and controlled product use to protect hair health and maximize braid longevity.
| Point | Details |
|---|---|
| Cleanse and reset the scalp | Use a clarifying shampoo 4–8 weeks before braiding to remove buildup and strengthen the hair shaft. |
| Detangle before washing | Work through tangles on dry hair first to prevent fairy knots and reduce shedding during the wash. |
| Deep condition with heat | Leave conditioner on for 15–30 minutes and use a heat cap to maximize moisture penetration and elasticity. |
| Dry hair completely | Blow-dry in sections to eliminate all moisture, especially at the roots, before installation. |
| Use lightweight products | Apply water-based leave-ins and minimal oil to maintain moisture without making hair too slippery for styling. |
What I have learned from years of watching braids go wrong
After seeing hundreds of clients sit in the chair, the pattern is clear. The clients who arrive with well-prepped hair leave with styles that last. The ones who skip the prep steps are back in two weeks with frizz, breakage, or scalp irritation.
The most common mistake I see is washing hair the morning of the appointment. Freshly washed hair is too slippery for consistent tension, and that slippage shows up as uneven braids that loosen faster than they should. Washing 24–48 hours ahead makes a real difference in the quality of the finished style.
The second mistake is ignoring pain signals. Pain during braiding is not normal. It signals excessive tension, which is a direct path to traction alopecia. Proper prep, especially moisture and slip, reduces the tension needed to create a clean braid. If your scalp hurts, speak up. A good stylist will adjust.
The third thing I want you to take seriously is patience with the drying step. Clients often rush this because they are excited to get to the salon. Damp roots inside a braid create frizz and weaken the style from the inside out. Give your hair the full 24–48 hours it needs after washing. Your style will thank you for it.
Pre-braid care is not extra work. It is the work that makes everything else worth it.
— Afro
Afromagicbraiding is ready when your hair is
At Afromagicbraiding, we know that every great braid starts before you sit in the chair. Our stylists specialize in knotless braids and tension-free techniques that honor your hair's health as much as its beauty.

When you arrive prepped, cleansed, and moisturized, our team can focus on delivering the clean sections, even tension, and precise styling that make your look uniquely yours. Browse our braid style portfolio to find the style that fits your vision, then book your appointment and come in ready. We are here to make sure every braid tells a story you are proud to wear.
FAQ
How long before braiding should I wash my hair?
Wash your hair 24–48 hours before your appointment. This gives scalp oils time to rebalance, which improves stylist grip and reduces slippage during installation.
What happens if I braid damp hair?
Braiding damp hair causes hygral fatigue and mid-section frizz. Moisture trapped inside a braid also creates conditions for scalp irritation and weakens the hair shaft over time.
Should I deep condition before getting braids?
Deep conditioning before braids improves elasticity and reduces breakage under tension. Leave the conditioner on for 15–30 minutes and use a heat cap for best results.
What products should I avoid before braiding?
Avoid heavy petroleum greases and excess oils before braiding. These make hair too slippery for consistent tension and cause flaking or buildup inside the braid.
Is pain during braiding a sign of bad prep?
Pain during braiding signals excessive tension and is not normal. Proper moisture and slip from good pre-braid care reduce the tension needed for a clean style and lower the risk of traction alopecia.