
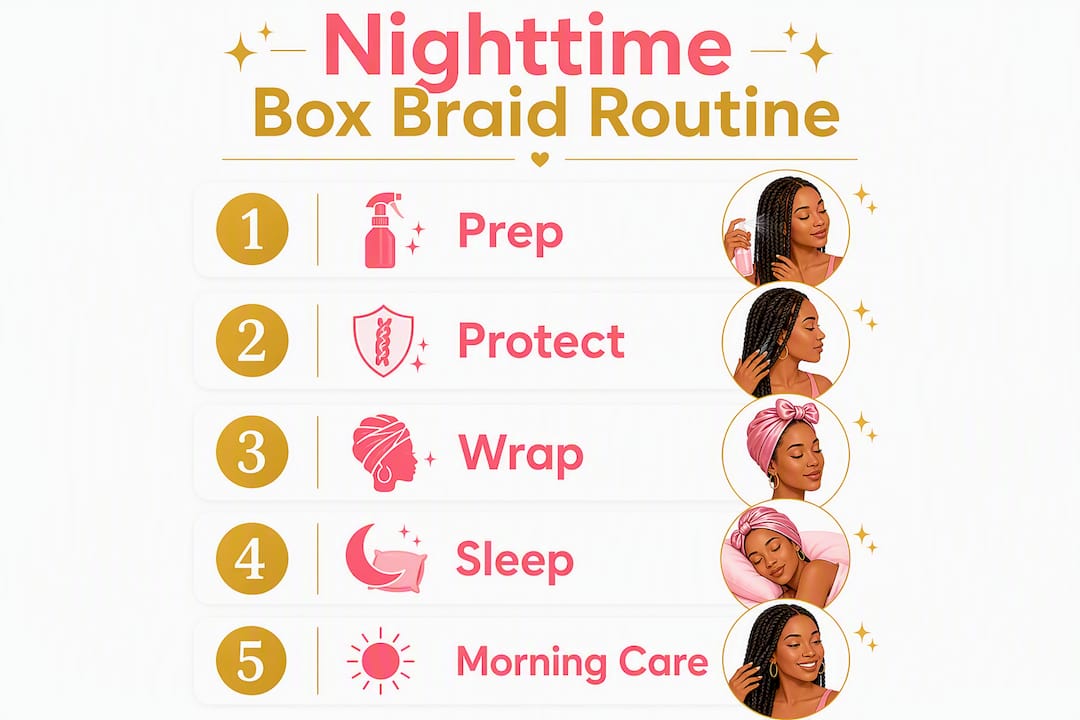
Cover your box braids with a roomy satin bonnet tonight, or loosely gather long braids into a pineapple with a satin-covered scrunchie before bed. That single step cuts friction and keeps your natural hair oils where they belong, on your strands, not absorbed into a cotton pillowcase. If your bonnet slips during the night, a satin pillowcase is your backup; pair it with hydrating lip masks and overnight sleeping masks for a full sleep-care beauty routine. Here is what to grab before you turn off the light:
- A roomy satin or silk bonnet (sized for your braid length)
- One satin-covered scrunchie for a pineapple or loose bun
- A satin pillowcase as a fallback
These three items are the foundation of solid box braid night care. Everything else in this guide builds on them.
Table of Contents
- What are the fastest ways to tie box braids for sleep?
- How do you protect long box braids overnight?
- How do you sleep with short or medium box braids?
- What should you do the first night after getting box braids?
- What does a good morning routine look like after sleeping in braids?
- Which materials actually protect your braids overnight?
- Salon stylist tips from Afromagicbraiding: dos, don'ts, and what we see every day
- Key Takeaways
- The nightly routine is where your braids are won or lost
- Ready for braids that stay beautiful, night after night?
- Useful sources and further reading
What are the fastest ways to tie box braids for sleep?
You do not need a complicated routine. Most high-ranking how-to guides focus on one or two quick, comfortable methods, and that is exactly the right approach. Pick the one that fits your braid length and how you sleep.
Roomy satin bonnet
Pull all your braids to the top or back of your head, gather them loosely, and slide the bonnet over everything. No tie, no tension.
- Best for: Medium to long braids, side and back sleepers
- Pros: Full coverage, zero manipulation, fast
- Con: Can slip off if the elastic is too loose; size up for bulky braids
Pineapple
Flip all braids to the top of your head and secure with one satin-covered scrunchie. The hold should feel like a gentle hug, not a grip.
- Best for: Long braids, stomach sleepers who need braids out of the way
- Pros: Reduces neck strain, keeps braids from being crushed
- Con: Can cause tension at the roots if tied too tight or left up too long
Loose low bun
Gather braids at the nape of your neck into a soft, low bun and secure with a satin scrunchie. Place a satin bonnet over the bun.
- Best for: Medium-length braids, anyone who finds a high pineapple uncomfortable
- Pros: Comfortable for back sleepers, minimal tension
- Con: Bun can create a slight crease if the scrunchie is too tight
Crisscross scarf wrap
Split braids into two sections, bring each section forward over the opposite shoulder, and wrap a satin scarf around the perimeter of your head to hold everything in place. This method works well as a fallback when a high pineapple is uncomfortable.
- Best for: Short to medium braids, anyone who prefers a flat wrap
- Pros: Keeps braids flat and tangle-free, great for preserving edges
- Con: Takes a little practice to get the tension right
| Method | Comfort | Frizz Control | Best Braid Length |
|---|---|---|---|
| Roomy satin bonnet | High | High | Medium to extra-long |
| Pineapple | Medium | High | Long to extra-long |
| Loose low bun | High | Medium | Medium |
| Crisscross scarf wrap | Medium | High | Short to medium |
Pro Tip: Always size up your bonnet. A bonnet that fits snugly around your edges but has plenty of room inside will not create a painful lump at the back of your head when you lie down.
How do you protect long box braids overnight?
Long and extra-long braids need a little more intention. The goal is keeping them gathered without pulling at your roots or straining your neck. Follow this sequence every night and your installation will thank you.
- Detangle gently. Run your fingers through your braids from mid-length to ends to separate any that have started to interlock during the day. Never start at the root.
- Gather loosely at the crown. Flip all braids to the top of your head. The gather point should sit high but feel completely painless.
- Secure with one satin-covered scrunchie. Wrap it once, maybe twice. More than two wraps creates continuous pulling at the roots all night.
- Slide on an extra-large satin bonnet. For extra-long or very thick braids, a standard bonnet will bunch up and create pressure. Go for an oversized or "jumbo" bonnet that fits over the full pineapple without compressing it.
- Lay a silk scarf over the bonnet. Tie it loosely at the front to keep the bonnet in place if you move around in your sleep.
What to use at each step:
- Extra-large satin bonnet (look for one with a wide, soft elastic band)
- Satin-covered scrunchie (avoid metal clasps or tight fabric bands)
- Lightweight silk scarf for securing the bonnet
A word on traction: If gathering your braids into a pineapple causes any pulling, stinging, or scalp soreness, skip the tie entirely. Lay your braids on a satin pillowcase and let them rest flat. Traction alopecia, the gradual loss of edges from repeated tension, is a real risk when tight styles are compounded by tight nighttime ties. If scalp pain persists beyond the first two days after installation, contact your braider.
How do you sleep with short or medium box braids?
Short braids cannot be pineappled, and a bulky bun is not always comfortable. The wrap-and-tuck method keeps shorter styles flat, protected, and crease-free.
- Smooth braids back from your face. Use your palms, not a brush, to lay them flat toward the back of your head.
- Fold a satin scarf into a triangle. Place the longest edge along your hairline and tie the two ends at the back of your neck. This keeps the scarf flat with no bulk at the crown.
- Tuck the remaining tail of the scarf under the tied section. This secures everything without adding a knot that could press into your scalp.
- Alternatively, use a small satin bonnet. For medium braids, a fitted (not tight) bonnet works well. Look for one with a soft, wide elastic band that sits at the hairline without digging in.
Material options that reduce bulk:
- Triangle-folded satin scarf: the flattest option, great for short braids
- Small fitted satin bonnet: quick and easy, good for medium lengths
- Silk headwrap: slightly more coverage, comfortable for side sleepers
Saving your edges: The hairline is the most vulnerable part of any protective style. Make sure whatever you use sits on the hairline gently, not pulled tight. If you notice your edges looking thinner or feeling tender, that is your signal to loosen up and check in with your braider about the installation tension.
What should you do the first night after getting box braids?
Fresh braids need the gentlest possible treatment. The scalp is adjusting to the new tension, and adding more pressure by tying braids up tightly can push discomfort into real pain.
On the first night after installation, your only job is to reduce friction, not to style. Skip the pineapple, skip the tight wrap. Lay your braids on a satin pillowcase and let them rest. That is enough protection for night one.
Immediate no-nos after a fresh install:
- Do not tie braids tightly or force them into a high pineapple if it causes any pulling
- Do not sleep on a cotton pillowcase (friction will frizz new braids fast)
- Do not apply heavy oils directly to the scalp on night one; the scalp needs to breathe
- Do not attempt to loosen tight braids yourself by pulling at the roots
When to call your braider:
- Pain that does not ease within 48 hours
- Numbness or tingling along the scalp or hairline
- Bumps, pimples, or severe tenderness at the roots
- Visible lifting or thinning at the edges
Forcing protective ties on an overly tight installation can lead to long-term edge damage. Professional loosening or a re-do is always the safer choice. You can read more about box braids and hair retention to understand how installation tension affects your hair over time.
What does a good morning routine look like after sleeping in braids?
The morning reset is just as important as the night routine. A few minutes of gentle care after you wake up keeps your braids looking fresh and polished all day.
- Remove your bonnet or scarf slowly. Pull it off from the back, not the front, to avoid dragging braids forward and creating frizz at the hairline.
- Shake and separate. Flip your braids forward and give them a gentle shake. Use your fingers to separate any that have settled together overnight.
- Mist lightly with a braid spray or leave-in mist. Hold the bottle 6–8 inches from your hair and mist the length of your braids, not the scalp. This restores a little moisture without making braids heavy or wet.
- Smooth flyaways with a small amount of edge oil or light mousse. Apply with your fingertips along the hairline and use a soft bristle brush or your palm to lay them down.
- Fluff and go. Your braids should look close to day-one fresh.
Morning product suggestions:
- Braid refresh spray or lightweight leave-in mist (water-based, no heavy silicones)
- Light edge oil or edge control (a pea-sized amount is enough)
- Optional: a tiny amount of light mousse on flyaway braids
Pro Tip: Resist the urge to re-wet your braids fully in the morning. A targeted mist and finger smoothing resets the style without the frizz that comes from too much moisture. If braids feel stiff, a little warmth from your palms as you smooth them is all you need.
Which materials actually protect your braids overnight?
The material touching your hair while you sleep matters more than most people realize. Cotton absorbs your hair's natural oils and creates friction that leads to frizz and breakage. Satin and silk do the opposite: they let your braids glide, keeping moisture in the hair shaft where it belongs.
| Material | Coverage | Comfort | Best Use |
|---|---|---|---|
| Satin bonnet (large) | Full head | High | Long or thick braids, all sleepers |
| Silk scarf | Full head | High | Short to medium braids, wrap method |
| Satin pillowcase | Passive backup | Very high | All braid lengths, bonnet slips off |
| Satin scrunchie | Ponytail/bun only | High | Securing pineapple or loose bun |
Matching your bonnet or scarf type to your braid length and bulk makes a real difference in how well your style holds. A satin scarf works well for shorter braids; a roomy bonnet handles thicker, longer lengths better. A satin pillowcase is the best backup when wraps slip during the night.
What to look for when buying:
- Bonnets: wide, soft elastic band; enough interior room for your full braid volume; 100% satin or silk lining
- Scarves: at least 35 inches square for a full wrap; smooth satin or silk weave, not a rough charmeuse
- Pillowcases: 100% satin or silk, not a satin-blend with a high polyester content
- Scrunchies: satin-covered, no metal clasps, wide enough to distribute tension across the ponytail
One more note on scalp care: if your scalp itches under braids at night, a lightweight scalp serum with peppermint or tea tree oil can calm irritation. Apply sparingly with a dropper directly to the parts, not all over the scalp, to avoid residue buildup that attracts lint and dirt under your braids.
Also, never sleep with wet braids. Moisture trapped inside a braid can lead to mildew and odor. Always dry braids thoroughly after washing before you go to bed.
Salon stylist tips from Afromagicbraiding: dos, don'ts, and what we see every day
At Afromagicbraiding, we see the results of nighttime habits every time a client sits in our chair. The braids that last longest, stay freshest, and cause the least scalp stress all have one thing in common: a consistent, gentle nightly routine.
Salon dos:
- Choose a bonnet that is one size larger than you think you need
- Use a satin pillowcase every night, even when you also wear a bonnet
- Apply scalp oil or serum to your parts before bed, not to the braids themselves
- Patch-test any new scalp product on a small area first, especially if your scalp is sensitive post-installation
- Contact your braider within 48 hours if pain, numbness, or edge lifting does not resolve
Salon don'ts:
- Do not re-tie a tight installation; you will compound the tension, not relieve it
- Do not use cotton scarves, cotton pillowcases, or terry cloth towels on braids at night
- Do not apply heavy butters or thick oils to the length of your braids before bed; they attract lint and weigh braids down
- Do not skip the morning reset; compression from sleep builds up over days and dulls the style
Pro Tip: Your edges are the most delicate part of your protective style. If your bonnet elastic sits directly on your hairline and feels tight, fold the elastic back once so it rests on your forehead instead. That small adjustment removes direct pressure from the most vulnerable hair.
Traction alopecia is preventable. The leading cause we see in the salon is not the braiding itself — it is the accumulation of tension from tight nighttime ties, tight bonnets, and too-snug scrunchies applied night after night on top of an already firm installation. One loose tie will not cause damage. A hundred tight ones will. Protect your edges like the investment they are.
For more on how installation technique affects long-term hair health, our post on box braids tips for healthy, long-lasting styles goes deeper into what to ask your braider before you sit down.
Key Takeaways
A roomy satin bonnet, one satin-covered scrunchie, and a satin pillowcase are all you need to protect box braids every night and extend the life of your installation.
| Point | Details |
|---|---|
| Cover with satin every night | A roomy satin bonnet or silk scarf reduces friction and keeps moisture in your braids. |
| Keep all ties loose | One wrap with a satin scrunchie is enough; tight ties compound installation tension and stress edges. |
| Satin pillowcase is your backup | When bonnets slip, a satin pillowcase passively protects all braid lengths while you sleep. |
| Morning reset matters | A gentle shake, light braid mist, and finger smoothing revives your style without rewetting or causing frizz. |
| Afromagicbraiding for professional care | Book a tension check or corrective adjustment at Afromagicbraiding if pain, edge thinning, or tightness persists. |
The nightly routine is where your braids are won or lost
Here is something we do not say enough at the salon: the installation is only half the story. We can put in the most precise, tension-free box braids you have ever worn, but if they spend six weeks being crushed against a cotton pillowcase every night, they will frizz, unravel at the ends, and stress your edges in ways that show up long after the style comes out.
What I find most clients underestimate is how cumulative the damage is. One night without a bonnet is not a crisis. But three weeks of skipping the routine? That is where you start to see the puffiness, the frizz halo, the thinning at the temples. The nightly routine is not a luxury step. It is the thing that makes a six-week installation actually last six weeks.
The other piece most guides skip: morning care is just as protective as the night routine. Removing your bonnet gently, shaking out your braids, and doing a quick mist-and-smooth takes three minutes and keeps your style looking like it just came out of the salon. That consistency is what separates braids that look great at week six from ones that look tired at week three.
If you are dealing with persistent tightness, scalp pain, or edges that are not bouncing back, please do not wait it out. Reach out to us and we will help you figure out the right next step, whether that is a professional adjustment, a re-do, or just some guidance on what to use at home.
Ready for braids that stay beautiful, night after night?
At Afromagicbraiding in Southfield, MI, every installation is done with your long-term hair health in mind. We use tension-aware techniques and take the time to discuss your nightly care routine before you leave the chair, because a great protective style deserves great aftercare.

Whether you need a fresh set of box braids, a corrective adjustment on an installation that feels too tight, or guidance on the right bonnets and scrunchies to use at home, we have you covered. Our in-salon accessory selection includes satin bonnets, satin scrunchies, and braid-care essentials so you can leave with everything you need for night one.
Browse our braiding portfolio to see the styles we create, then book your appointment directly online. Your braids, and your edges, will feel the difference.
Useful sources and further reading
- Box Braid Styling Ideas That Actually Work for You — Afromagicbraiding's guide to styling and maintaining your braids between appointments
- How to Maintain Braids: Expert Tips for 2026 — Extended care guidance from the salon, covering washing, moisturizing, and longevity
- Box Braids Tips for Healthy, Long-Lasting Styles — Afromagicbraiding's deep dive into what keeps protective styles healthy from install to takedown
- How to Protect Braids at Night: Scarves, Products, & More — WikiHow's practical overview of nighttime braid protection methods