
Braiding hair is the practice of interweaving three or more strands into a structured pattern, creating styles that are both protective and visually striking. Whether you want to master a simple three-strand braid or work up to Fulani-inspired designs, the skill starts with understanding tension, sectioning, and hair health. This guide walks you through every foundational technique, from choosing the right tools to executing French and Dutch braids with confidence. Every braid tells a story, and yours starts right here.
How to braid hair: tools and preparation
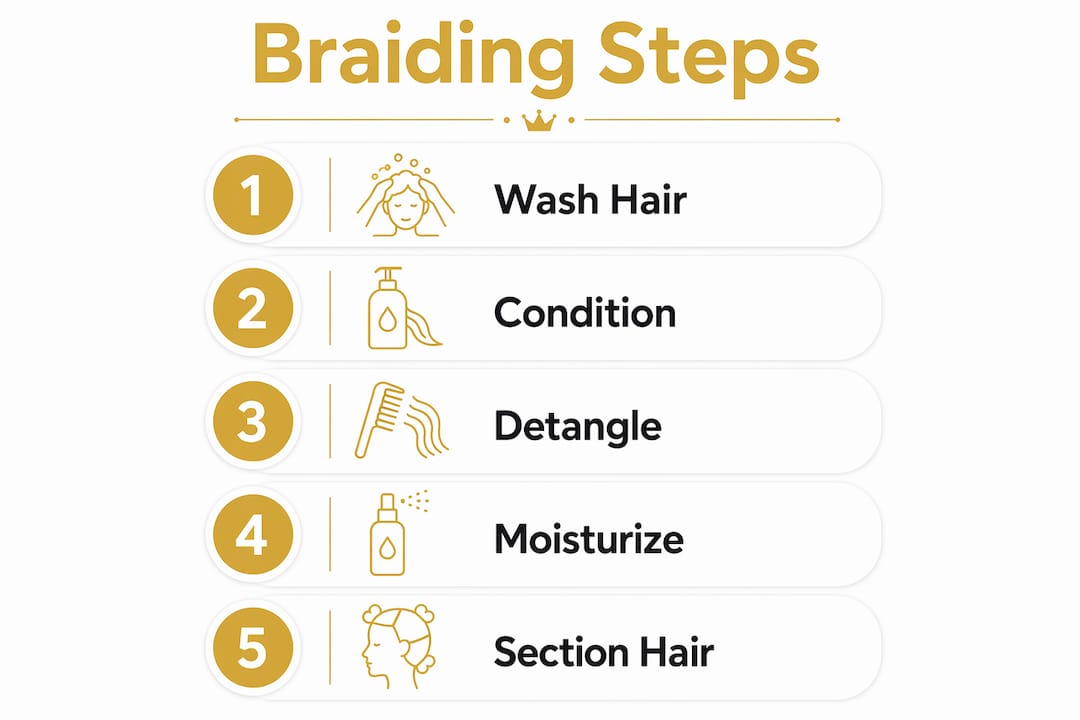
Before your fingers touch a single strand, your hair needs to be in the right condition. Clean, detangled, and moisturized hair braids more neatly, holds longer, and causes less breakage.

The essential toolkit
The right braiding tools make a measurable difference in your results. Here is what you need:
- Wide-tooth comb: Detangles without snapping strands. Always work from ends to roots to prevent breakage during detangling.
- Rat-tail comb: Creates precise, clean sections that improve braid neatness and how long the style lasts.
- Soft hair elastics: Secure ends without causing the friction or damage that rubber bands create.
- Leave-in conditioner or styling cream: Adds slip and moisture before you begin.
- Light-hold gel or edge control: Smooths flyaways and keeps the style polished.
Washing, conditioning, and moisturizing
Thorough shampooing before braiding removes buildup that causes itching and odor, especially important when wearing a protective style for several weeks. Follow with a moisturizing conditioner, then apply your leave-in while hair is still damp.
For natural hair textures, the LOC or LCO methods are the most effective way to lock in moisture before braiding. LOC stands for Leave-in, Oil, Cream. LCO reverses the oil and cream steps. Both approaches seal hydration into the strand, reducing the risk of breakage under braid tension. Slightly damp hair also grips better than bone-dry hair, giving you cleaner sections and more defined results.
Pro Tip: Apply a small amount of castor oil or shea butter to your scalp before braiding. This keeps the scalp nourished throughout the wear period without making the style look greasy.
| Preparation step | Why it matters |
|---|---|
| Shampoo and condition | Removes buildup; prevents scalp irritation during wear |
| Detangle ends to roots | Reduces breakage and creates smooth, even sections |
| Apply LOC or LCO method | Locks in moisture to protect hair under braid tension |
| Work on slightly damp hair | Improves grip and braid definition |
What are the basic braiding techniques for beginners?
Mastering the three-strand braid before moving to anything else is the single most important rule in braiding. Every advanced style, from fishtail to Dutch, builds on this foundation.
Three-strand braid: step by step
- Divide a section of hair into three equal parts. Hold the left strand in your left hand and the right strand in your right hand, with the middle strand resting between them.
- Cross the right strand over the middle strand. The right strand is now the new middle.
- Cross the left strand over the new middle strand. The left strand becomes the new middle.
- Continue alternating right over middle, then left over middle, maintaining even tension throughout.
- Leave 1 to 3 inches of unbraided hair at the end and secure with a soft elastic to prevent unraveling.
French braid vs. Dutch braid: what is the difference?
French braids weave strands over the center, which creates a flat, close-to-the-scalp style. Dutch braids weave strands under the center, which pushes the braid up and creates a raised, three-dimensional texture. The Dutch braid is sometimes called an "inside-out" French braid because the mechanics are reversed.
How to French braid:
- Take a section of hair at the crown and divide it into three strands.
- Cross the right strand over the middle, then the left strand over the middle.
- Before the next cross, pick up a small section of loose hair from the right side and add it to the right strand. Cross the combined strand over the middle.
- Repeat on the left side, adding hair before each cross.
- Continue down the head, adding hair with each pass until all loose hair is incorporated. Finish as a standard three-strand braid and secure.
How to Dutch braid:
Follow the same steps as the French braid, but cross each strand under the middle instead of over. This single change creates the raised, sculptural effect that makes Dutch braids so visually bold.
| Feature | French braid | Dutch braid |
|---|---|---|
| Strand direction | Over the center | Under the center |
| Visual result | Flat, woven look | Raised, 3D texture |
| Best for | Sleek, polished styles | Bold, textured looks |
| Skill level | Beginner to intermediate | Intermediate |
Pro Tip: If your braid looks uneven, the culprit is almost always inconsistent tension. Practice on a friend first so you can see what you are doing, then work up to braiding your own hair in the mirror.
Applying light hairspray or styling gel after finishing a braid holds flyaways and extends the style without weighing hair down. This is especially useful for fine or silky hair textures that tend to slip.
How do you do fishtail, rope, and 5-strand braids?
Once the three-strand braid feels natural, these styles are the next step. They suit braid styles for long hair particularly well, though rope braids work on shorter lengths too.
Fishtail braid
- Divide hair into two equal sections instead of three.
- Take a thin strand from the outer edge of the right section and cross it over to join the left section.
- Take a thin strand from the outer edge of the left section and cross it over to join the right section.
- Repeat, alternating sides. The thinner your strands, the more intricate the finished braid looks.
- Secure with an elastic. For a fuller look, gently tug apart the sides of the finished braid to loosen the weave.
The fishtail braid rewards patience. Rushing with thick strands produces a chunky result that loses the signature herringbone pattern.
Rope braid
- Divide hair into two sections.
- Twist each section clockwise on its own.
- Once both sections are twisted, wrap them around each other counterclockwise.
- Secure the end. The opposing twist directions lock the braid in place without an elastic at the top.
Rope braids work well on medium to long hair and are one of the fastest easy hairstyles for braiding when you need a polished look quickly.
5-strand braid
The 5-strand braid produces a wide, lattice-like pattern that looks far more complex than it is once you understand the numbering system.
- Divide hair into five sections, numbered 1 through 5 from left to right.
- Move strand 2 over strand 3.
- Move strand 5 under strand 4 and over strand 2.
- Move strand 1 over strand 3.
- Repeat the sequence, renumbering as strands shift position.
This style suits thick or long hair best. On fine or short hair, the sections become too thin to show the pattern clearly.
How do protective braids benefit natural hair?
Protective braiding is defined as any style that tucks away the ends of the hair, reducing daily manipulation and friction. Protective braids reduce friction and tangling during activities like sleeping and traveling, which directly supports length retention and overall hair health.
The core benefits of wearing braids as a protective style include:
- Reduced manipulation: Fewer daily styling sessions mean less mechanical stress on strands.
- Moisture retention: Sealed ends lose less moisture to the environment.
- Length retention: Hair that is not constantly combed, heat-styled, or exposed to friction retains more length over time.
- Scalp rest: A well-installed braid style gives the scalp a break from daily product application and brushing.
For those learning how to braid natural hair, the protective benefits are the primary reason to invest time in the skill. Natural hair textures, particularly 4A, 4B, and 4C types, are more prone to dryness and breakage, making protective styling a practical tool for healthy hair growth.
Maintaining scalp health during braid wear
Scalp care does not stop once the braids are in. Balancing protective style wear time is critical for scalp health and reducing unnecessary manipulation. Most stylists recommend keeping braids in for four to eight weeks maximum. Beyond that window, new growth tangles with the base of the braid, making takedown more damaging.
Pro Tip: Dilute a scalp oil like tea tree or peppermint oil with a carrier oil such as jojoba, and apply it directly to the scalp using an applicator bottle every five to seven days while wearing braids. This keeps the scalp clean and hydrated without disturbing the style.
Healthy hair under braids comes from what you do before and during the style, not just after. Preparation and maintenance are the real protective work.
When it is time to remove braids, cut the elastic and gently unravel each braid from the bottom up. Apply a generous amount of conditioner or detangling spray before combing to minimize breakage during takedown.
Key takeaways
Mastering how to braid hair requires the right tools, properly prepared hair, and consistent practice of foundational techniques before advancing to complex styles.
| Point | Details |
|---|---|
| Prepare hair thoroughly | Shampoo, condition, and apply LOC or LCO method before every braid session. |
| Start with three-strand braids | Build confidence with the basic braid before attempting French, Dutch, or fishtail styles. |
| Use a rat-tail comb for sections | Clean, precise sections are the foundation of neat, long-lasting braids. |
| Protective styles support hair health | Braids reduce manipulation and friction, promoting length retention especially for natural hair. |
| Limit wear to four to eight weeks | Keeping braids beyond this window increases the risk of tangling and breakage at the root. |
Why the basics are the real secret
Here is something I have seen over and over at Afromagicbraiding: clients come in wanting box braids or Fulani-inspired styles, and when we ask them to show us a simple three-strand braid, they struggle with tension. That is not a criticism. It is just the truth about how braiding works. The three-strand braid is not a beginner exercise you graduate from. It is the muscle memory that every other technique runs on.
What I tell every person learning to braid is this: spend two weeks doing nothing but three-strand braids on a mannequin head or a willing friend. Do them loose, do them tight, do them on wet hair and dry hair. By the end, your hands know what even tension feels like without you having to think about it. That automatic feel is what separates a braid that holds for three weeks from one that unravels by morning.
The other thing I want you to hear is that hair health is always the priority over style complexity. A gorgeous 5-strand braid on damaged, dry hair is not a win. Clean, moisturized, well-sectioned hair in a simple three-strand braid is. Every braid we install at Afromagicbraiding starts with that principle, and it is the reason our clients leave with styles that last and hair that thrives underneath.
— Afro
Ready for braids that are uniquely yours?
At Afromagicbraiding, every braid installation starts with a personalized consultation on your hair type, texture, and goals. Our stylists bring years of experience with protective styles, from knotless box braids to intricate Fulani-inspired designs, and we source premium braiding hair globally to match your vision.

Whether you are building your own skills or ready to leave it to the professionals, explore our braiding portfolio to see the full range of styles we create. When you are ready to book, schedule your appointment and let us take care of the rest. Exceptional results, every time.
FAQ
What is the easiest braid for beginners?
The three-strand braid is the easiest starting point for beginners. It uses a simple over-under pattern that builds the hand coordination and tension control needed for every other braid style.
How do I keep my braids from unraveling?
Leave 1 to 3 inches of unbraided hair at the end and secure with a soft elastic. Applying a small amount of styling gel before braiding also helps fine or slippery hair hold its shape.
How long should I keep braids in for healthy hair?
Most professional stylists recommend wearing braids for four to eight weeks. Wearing them longer allows new growth to tangle with the braid base, which increases breakage risk during removal.
What is the difference between a French braid and a Dutch braid?
French braids cross strands over the center to create a flat, scalp-hugging style. Dutch braids cross strands under the center, producing a raised, three-dimensional braid that sits on top of the hair.
Do I need to wash my hair before braiding?
Yes. Shampooing before braiding removes product buildup that causes itching and odor during wear. Clean hair also holds braids more neatly and supports scalp health throughout the protective style period.