You want a protective style that looks stunning, lasts for weeks, and doesn't leave your scalp screaming by morning. That's not too much to ask, and yet so many women in Southfield and the surrounding metro area end up with braids that are too tight, too heavy, or installed without the right preparation. The good news? Understanding the natural hair braiding process from start to finish puts you in control. Whether you're considering knotless braids, classic box braids, or something in between, this guide walks you through everything: the right tools, the step-by-step technique, the mistakes to avoid, and how to keep your style looking fresh for weeks.
Table of Contents
- What you need for the natural hair braiding process
- Step-by-step instructions for creating natural hair braids
- Common mistakes and comfort tips for safe braiding
- How to check your braids and maintain your new style
- What most stylists won't tell you about scalp comfort and protective braiding
- Ready for worry-free, beautiful braids in Southfield?
- Frequently asked questions
Key Takeaways
| Point | Details |
|---|---|
| Proper preparation matters | Start with clean, stretched natural hair for the easiest braiding and best results. |
| Knotless method reduces tension | Knotless braids feed extension hair in, making them gentler on your scalp than traditional box braids. |
| Comfort equals longevity | Techniques that protect your scalp help braids last longer and look better. |
| Check and maintain | Regularly inspect and moisturize your roots and edges to extend your style’s lifespan. |
| Choose skilled professionals | A high-rated braider with experience in the style you want can make all the difference. |
What you need for the natural hair braiding process
Now that you understand why the process matters, let's look at what you'll need before starting your braids. Going in without the right tools is like cooking a complex recipe without your ingredients measured out. Everything falls apart faster than it should.
Essential tools and materials
Here's what every successful braid installation requires:
- Rat-tail comb: Creates clean, precise parts. A sharp, fine-toothed tail is non-negotiable for neat sectioning.
- Spray bottle with water: Keeps natural hair pliable and easier to work with throughout the process.
- Edge control: Smooths down the hairline and baby hairs for a polished, finished look.
- Hair clips or butterfly clips: Holds sections out of the way while you work on others.
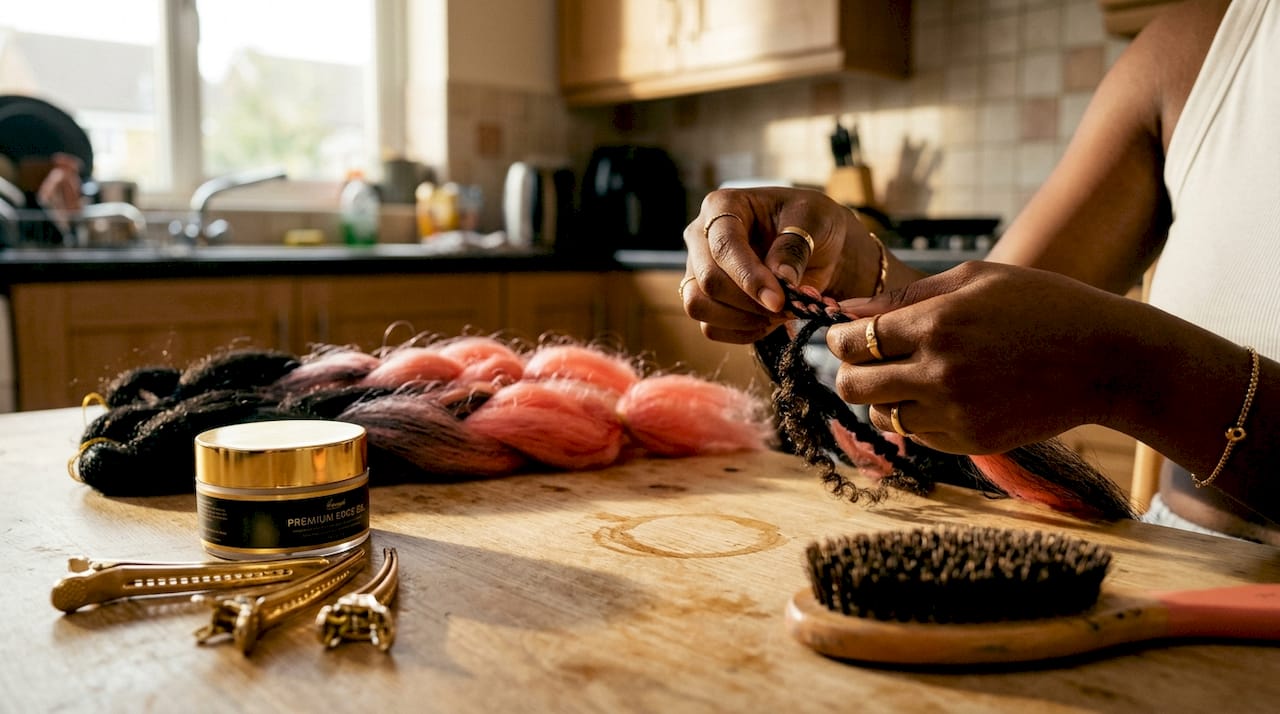
- Extension hair: Choose pre-stretched braiding hair for easier handling and a more natural finish.
- Lightweight moisturizer or leave-in conditioner: Preps your natural hair before installation.
- Scalp oil: Nourishes the scalp during and after the braiding session.
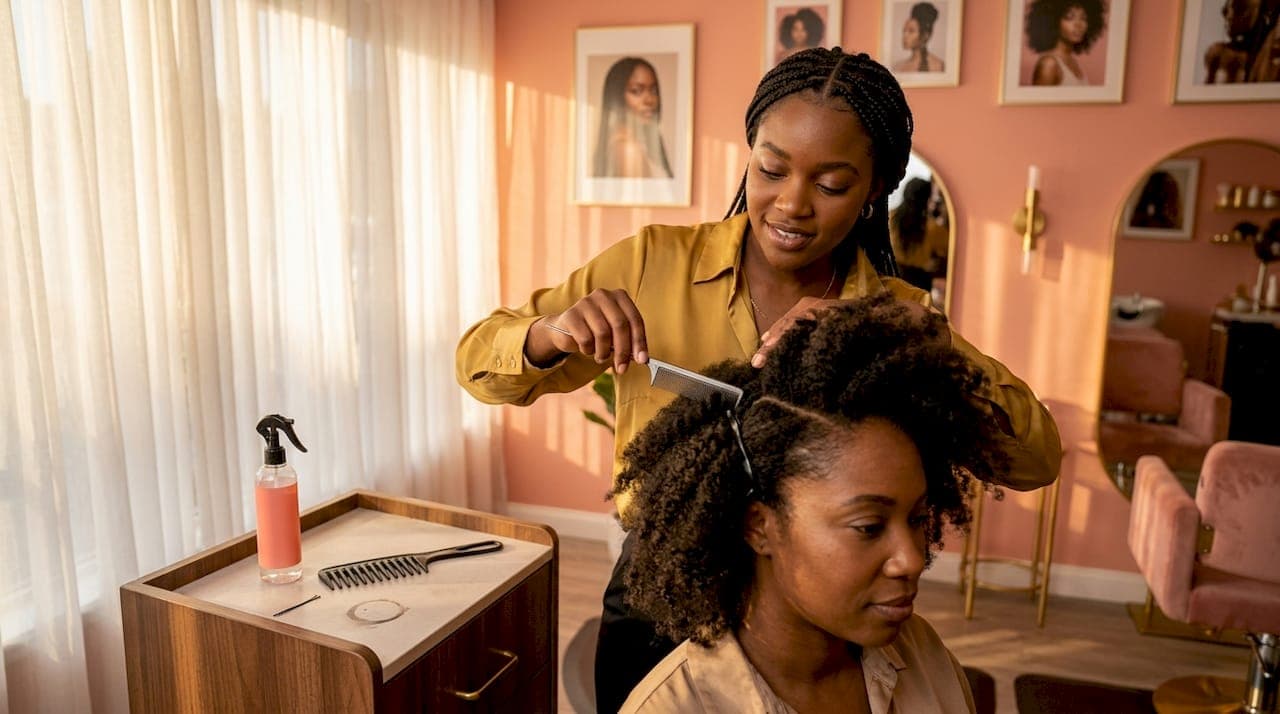
Preparing your natural hair
Before a single braid is started, your hair needs to be properly prepped. Clarify your hair with a gentle clarifying shampoo to remove product buildup. Follow with a deep conditioner to restore moisture. Then stretch your natural hair using a blow-dry on low heat or a banding method. Stretched hair is easier to braid evenly, reduces tangling with extensions, and helps your style lay smoother overall.
Pro Tip: Avoid heavy butters or thick creams right before braiding. They can make the hair slippery, which causes extensions to slip and braids to loosen faster.
Knotless vs. box braids: what's the difference?
This is one of the most important decisions you'll make before sitting in the chair. Knotless braids use a feed-in method where the stylist starts with your natural hair and gradually adds extension hair, creating a seamless base that reduces tension at the root compared to traditional box braids, which begin with a knot. That distinction matters more than most people realize.
| Feature | Knotless braids | Box braids |
|---|---|---|
| Starting method | Feed-in with natural hair | Knot at the root |
| Root tension | Lower | Higher |
| Weight distribution | Gradual | Concentrated at root |
| Installation time | Longer | Shorter |
| Best for | Sensitive scalps | Thicker, stronger roots |
| Longevity | 4 to 6 weeks | 4 to 8 weeks |
Browse our braid style gallery to see real examples of both styles before you decide which direction feels right for you. Our braiding services page also breaks down the options in detail.
Step-by-step instructions for creating natural hair braids
With your materials ready, it's time to move step by step through the core braiding process. This is where precision pays off. Rushing any of these steps is the fastest way to end up with uneven braids or scalp discomfort.
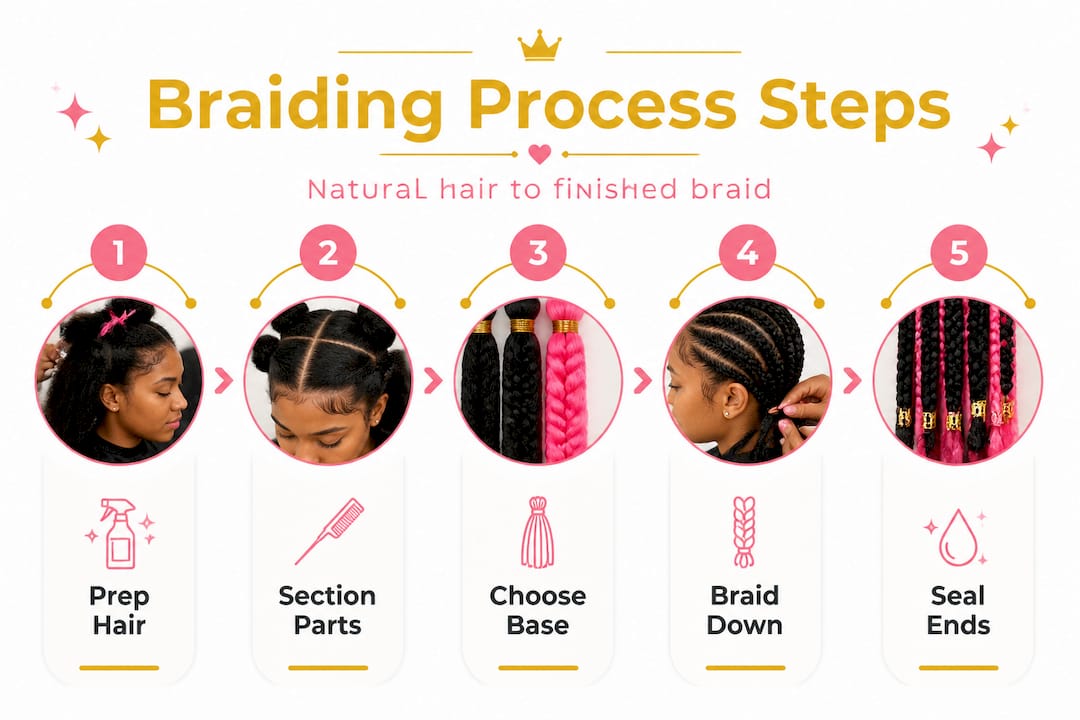
Step 1: Section your hair
Start with clean, stretched, and moisturized hair. Use your rat-tail comb to part the hair into four main quadrants: front left, front right, back left, and back right. Clip each section away. Working quadrant by quadrant keeps you organized and ensures you don't miss any sections or create uneven parts.
Step 2: Create your individual parts
Within each quadrant, part out individual braid sections. For a classic box braid look, use the comb to create clean square or rectangular parts. For a more natural, softer look, diagonal or triangular parts work beautifully. Consistency in section size is key because uneven sections create uneven braids.
Step 3: Choose your starting base
For knotless braids, begin braiding with only your natural hair for the first inch or so. Then gradually fold in small pieces of extension hair as you continue braiding downward. This is the tension-free feed-in technique that makes knotless braids so comfortable.
For box braids, fold the extension hair in half around the root of the natural hair section and secure it with a knot before beginning the three-strand braid. This creates the classic, defined look but does add more immediate tension at the root.
Step 4: Braid downward with even tension
Whether you're doing knotless or box braids, the braiding motion itself should be consistent. Use your fingers to maintain even tension throughout each braid, not just at the root. Uneven tension creates bumpy, loose-looking braids that unravel quickly.
Step 5: Add extension hair gradually (knotless method)
As you braid down, continue feeding in small, thin pieces of extension hair every inch or two. The key is gradual addition. Adding too much at once creates a bulky, unnatural look. Thin, consistent additions result in a smooth, tapered braid that looks like it grew from your scalp.
Step 6: Seal the ends
Once you reach the desired length, seal the ends by dipping them briefly in hot water (for synthetic braiding hair) or using a small amount of edge control to secure the tip. This prevents unraveling and extends the life of your style.
Pro Tip: The feed-in base technique used in knotless braids is consistently shown to reduce root tension compared to the traditional knot attachment, making it the preferred choice for clients who experience scalp soreness after installations.
| Step | Knotless braids | Box braids |
|---|---|---|
| Root start | Natural hair only | Extension knot at root |
| Extension addition | Gradual, feed-in | All at once |
| Tension level | Low and distributed | High at root |
| Finish | Seamless, tapered | Defined, structured |
Check out our professional techniques portfolio to see how these methods translate into finished styles in real client appointments.
Common mistakes and comfort tips for safe braiding
Even with clear steps, some challenges can sideline a perfect braid. Here's how to avoid and fix the biggest mistakes before they become a problem.
Mistakes that cause damage
- Braiding too tightly: This is the number one cause of traction alopecia, a form of gradual hair loss caused by repeated pulling at the roots. If you can't comfortably raise your eyebrows after getting braids, they're too tight.
- Using too much extension hair: Heavy extensions put unnecessary weight and stress on the root. Lighter, pre-stretched hair distributes weight more evenly.
- Skipping the prep: Installing braids on dry, tangled, or buildup-coated hair leads to breakage at the points where natural hair meets extension hair.
- Neglecting the edges: The hairline is the most delicate area. Braiding the edges too tightly or too frequently without rest leads to thinning over time.
- Ignoring scalp signals: Bumps, redness, or persistent soreness beyond 48 hours after installation are signs that something needs to change.
Signs your scalp is under too much tension
Watch for these warning signs after your braids are installed:
- Headache that starts at the hairline
- Visible bumps or pimples at the root
- Redness or irritation along the parts
- Difficulty sleeping due to scalp pain
- Visible thinning or breakage at the edges
"Knotless braids reduce tension at the root compared to traditional box braids, making them the smarter choice for anyone prone to scalp soreness or traction-related concerns." Byrdie, Protective Styles for Black Hair
How to relieve discomfort after installation
If your braids feel too tight, act quickly. Apply a lightweight scalp oil like jojoba or peppermint oil directly to the roots and massage gently. Avoid tying your hair up in a tight bun or ponytail for the first week. Warm water rinses can also help loosen the tension slightly. If pain persists beyond 72 hours, visit your stylist to have a few braids loosened or removed.
Pro Tip: Ask your stylist to demonstrate the tension level before they complete the first braid. You should be able to gently pinch the skin near the part without it feeling pulled.
Read what real clients say about their comfort experience in our customer reviews section. Honest feedback from women who've sat in our chairs tells you more than any checklist can.
How to check your braids and maintain your new style
Once you've finished your braids, use this routine to ensure they look and feel their best and last as long as possible. A great installation deserves great aftercare.
Inspection checklist after installation
- Check parting symmetry: Stand in front of a mirror and look at the overall pattern. Parts should be consistent in width and direction throughout.
- Compare braid sizes: Hold two braids from different sections side by side. They should be roughly the same thickness from root to tip.
- Check the ends: All ends should be sealed and smooth, with no fraying or unraveling.
- Feel the root tension: Press gently at the base of several braids. There should be no sharp pulling or pinching sensation.
- Look at the edges: Hairline braids should lie flat without visible strain or lifted skin at the root.
Maintaining your style week by week
- Wrap your hair in a satin or silk scarf or bonnet every night to reduce frizz and friction.
- Moisturize your scalp every 2 to 3 days with a lightweight oil or braid spray.
- Refresh your edges with edge control as needed, usually every 5 to 7 days.
- Avoid excessive manipulation or pulling on individual braids.
- Wash your scalp gently with a diluted shampoo or a scalp cleanser every 2 weeks.
Style longevity benchmark: Southfield-area braiding businesses with strong client satisfaction ratings, like a 4.5-star average across 101 reviews, consistently reflect the kind of quality installation and aftercare guidance that keeps styles looking great for 4 to 6 weeks. That's the standard to expect from a professional salon experience.
Explore our gallery of finished styles to see what a well-executed, well-maintained braid installation looks like from day one through week six.
What most stylists won't tell you about scalp comfort and protective braiding
Beyond the step-by-step process, there's a deeper philosophy behind effective, protective braiding, and it's one that doesn't get talked about enough in the industry.
Here's the uncomfortable truth: there has long been an unspoken standard in braiding culture that tight equals neat, and neat equals professional. Clients sometimes even request tighter braids because they associate tension with durability. Stylists, wanting to deliver what clients ask for, comply. And the cycle continues, even as scalps suffer and edges thin over time.
We believe that's a standard worth challenging. The rise of knotless braiding methods is shifting what clients expect and what stylists are willing to deliver. The feed-in technique that defines knotless braids reduces root tension in a meaningful, measurable way, and more women are now asking for it by name. That's progress.
But here's what we want you to take away from this: you have every right to advocate for your own comfort in the braiding chair. If something hurts, say so. A skilled stylist will adjust without making you feel like you're being difficult. If a stylist dismisses your discomfort or insists that soreness is normal and unavoidable, that's a signal worth paying attention to.
Protective styles are supposed to protect your hair and your scalp. A style that looks beautiful but causes traction alopecia over time isn't truly protective. Longevity of your hair health matters more than how sleek a braid looks on day one. The best professional braiding services understand this and build their technique around client comfort, not just aesthetics.
Every braid we create at Afro Magic Braiding is rooted in this philosophy. Your style should feel as good as it looks, and it should still look good six weeks from now.
Ready for worry-free, beautiful braids in Southfield?
You've learned the process, the techniques, and the red flags to watch for. Now it's time to experience the difference that professional installation makes in person.

At Afro Magic Braiding, our stylists specialize in knotless braids, box braids, and a full range of protective styles, all installed with the tension-free techniques you've read about here. Browse our braiding portfolio to see before-and-after results from real Southfield clients. Then read what our community is saying in our client reviews section to hear directly from women who've made the switch to comfort-first braiding. When you're ready to book, our easy online scheduling makes it simple to secure your appointment with a stylist who genuinely cares about your hair health. Book an appointment today and let's create something beautiful together.
Frequently asked questions
How long do knotless braids usually last?
Knotless braids typically last 4 to 6 weeks with proper care, including nightly wrapping and regular scalp moisturizing. The feed-in installation method also helps them hold their shape longer because the gradual base is more secure than a single knot.
How can I relieve scalp soreness after braiding?
Apply a lightweight oil like jojoba or peppermint directly to the scalp and massage gently to increase circulation. Avoid tight updos for the first week, since additional tension on already-stressed roots slows recovery. If soreness persists beyond 72 hours, the feed-in technique used in knotless braids is a better option for your next installation.
Are knotless braids better for my scalp than box braids?
Yes, knotless braids are generally gentler because they reduce tension at the root compared to traditional box braids, which use a knot attachment that concentrates pulling at the base. For women with sensitive scalps or a history of traction concerns, knotless is the recommended choice.
What should I look for in a professional braider in Southfield?
Look for stylists with strong client reviews, a visible portfolio of styles similar to what you want, and a clear willingness to discuss comfort during the consultation. Southfield braiding businesses with ratings around 4.5 stars and 100 or more reviews are a reliable benchmark for the quality and consistency you should expect.
Recommended
- Best Hair Braiding in Southfield Michigan | Afro Magic Braiding Hair - Knotless Braids Southfield
- Best Hair Braiding in Southfield Michigan | Afro Magic Braiding Hair - Knotless Braids Southfield
- Best Hair Braiding in Southfield Michigan | Afro Magic Braiding Hair - Knotless Braids Southfield
- Best Hair Braiding in Southfield Michigan | Afro Magic Braiding Hair - Knotless Braids Southfield