Most people treat detangling as a five-minute afterthought before sitting in the braiding chair. Wash, comb quickly, done. But that rushed approach is one of the most common reasons box braids cause pain, uneven tension, or breakage within the first few weeks. Proper detangling is not just prep work. It is the foundation that determines how long your braids last, how healthy your hair stays underneath, and how smooth and polished the final style looks. This guide walks you through the tools, techniques, timing, and pitfalls so you can show up to your appointment with your hair truly ready.
Table of Contents
- Why detangling is crucial before getting box braids
- What causes tangles and knots in natural hair?
- Essential tools and products for detangling natural hair
- Step-by-step detangling routine for box braids prep
- Common mistakes to avoid when detangling for box braids
- A stylist's take: What most people miss when prepping for box braids
- Ready for flawless box braids? Let the Southfield pros help
- Frequently asked questions
Key Takeaways
| Point | Details |
|---|---|
| Detangle before braiding | Starting with fully detangled hair is key to comfort, neatness, and hair health during box braiding. |
| Use the right tools | Wide-tooth combs, moisturizing products, and gentle techniques protect your hair from breakage. |
| Follow a step-by-step routine | Sectioning, working from tips to roots, and taking your time make detangling easier and more effective. |
| Avoid common mistakes | Never detangle dry hair or rush through knots—these actions often lead to breakage and pain. |
| Expert help is available | Consult with Southfield professionals to ensure the best results for your box braids and hair health. |
Why detangling is crucial before getting box braids
When your hair has tangles, knots, or matted sections, braiding over them does not make them disappear. It locks them in place under tension. That trapped knot becomes a stress point on your strand, and as the braid tightens over time, the hair at that spot is far more likely to snap.
Detangling also plays a direct role in scalp health. When hair is smooth and separated, moisture can travel from root to tip more easily. Tangles act like little dams, blocking natural oils and any products you apply from reaching the lengths of your hair. Clients who arrive with well-detangled hair consistently leave with braiding style gallery results that look cleaner, sit flatter, and last noticeably longer.
Here is what happens when you skip this step:
- Uneven braids: Knots create bumps that disrupt the smooth feed of hair into each braid section.
- Scalp pain: Braiding over tangles pulls the surrounding strands tighter than necessary, leading to soreness that can last days.
- Premature loosening: Tangled hair does not grip as evenly, so braids can unravel or frizz faster.
- Thinning edges and breakage: The most fragile parts of your hair, your edges and ends, suffer most when knots are braided in under tension.
"Detangling is not about vanity. It is about protecting the hair you have worked hard to grow. Every braid tells a story, and we want yours to be a healthy one." — Afro Magic Braiding
Investing 30 to 60 extra minutes in proper detangling before your appointment is one of the highest-return things you can do for your hair's long-term health.
What causes tangles and knots in natural hair?
Understanding why your hair tangles helps you target the problem at its source rather than just dealing with the aftermath. The three biggest culprits are friction, dryness, and product buildup.
Friction happens constantly. Sleeping on a cotton pillowcase, wearing a hoodie, or even just moving your head throughout the day creates microscopic roughness on the hair cuticle. Over time, those roughened cuticles catch on each other and form tangles. Tighter curl patterns, like 4A through 4C textures, are especially prone to this because the natural coil shape gives strands more opportunity to wrap around each other.
Dryness makes everything worse. When hair lacks moisture, the cuticle layer lifts and becomes rough. Rough cuticles tangle more aggressively and are far more likely to break when you try to separate them. This is why detangling dry hair is such a damaging practice.
Product buildup is a sneaky one. Heavy creams, butters, and gels that are not fully washed out coat the strands and cause them to clump together in ways that look like tangles but are actually layers of residue binding the hair. These sections can be especially difficult to work through without the right products.
Common causes of tangling by hair type:
- Type 3 (loose curls): Mostly friction and dryness, especially at the ends.
- Type 4A/4B (tight coils): High shrinkage causes strands to coil around each other rapidly.
- Type 4C (very tight coils): All three causes apply, and neglected tangles compound into dense mats within days.
One thing many people underestimate is how quickly tangles multiply. A small knot that forms today will catch neighboring strands tomorrow. Within a week, that single knot can anchor a section of matted hair that takes 20 minutes to work through. Staying ahead of tangles with routine care is far easier than dealing with them all at once before a braiding services appointment.
Pro Tip: Keeping your hair moisturized between styles and getting regular trims every 8 to 12 weeks removes the split and frayed ends that are the most common starting points for new tangles.
Essential tools and products for detangling natural hair
Having the right tools makes the difference between a detangling session that feels like self-care and one that feels like a battle. Here is what you actually need and what each one does best.
Wide-tooth comb: The gold standard for initial detangling. The wide spacing between teeth allows it to glide through hair without snagging. Best for working through large sections after you have applied product.
Detangling brush (like a Denman or flexi-brush): These work well on looser curl patterns and can speed up the process significantly. On very tight coils, use with extra care and always start at the ends.
Your fingers: Genuinely underrated. Finger detangling lets you feel exactly where a knot is and work through it with precision. It takes longer but causes the least breakage of any method.
| Tool | Best for | Risk level | Speed |
|---|---|---|---|
| Wide-tooth comb | All textures, post-product | Low to medium | Medium |
| Detangling brush | Type 3 to 4B | Medium | Fast |
| Fine-tooth comb | NOT recommended for natural hair | High | Fast |
| Fingers | All textures, especially 4C | Very low | Slow |
When it comes to products, look for these key features:
- Slip: This is the most important quality. A good detangling product coats the strand so the comb glides instead of catching. Look for ingredients like aloe vera, glycerin, and silicone-free slip agents.
- Moisture: Leave-in conditioners that contain water as the first ingredient hydrate while they detangle.
- Lightweight formula: Heavy butters can weigh down fine strands. Save those for sealing after detangling.
A few product categories that work well for most natural hair types before a braid styles portfolio appointment:
- Water-based detangling sprays for quick refresh and added slip.
- Creamy leave-in conditioners for deeper moisture and longer-lasting softness.
- Lightweight oils like argan or jojoba to seal in moisture after detangling.
Avoid rough plastic combs with seams running along the teeth. Those seams snag and tear the hair cuticle with every stroke. Invest in a seamless wide-tooth comb. It is a small purchase that protects a major investment.
Step-by-step detangling routine for box braids prep
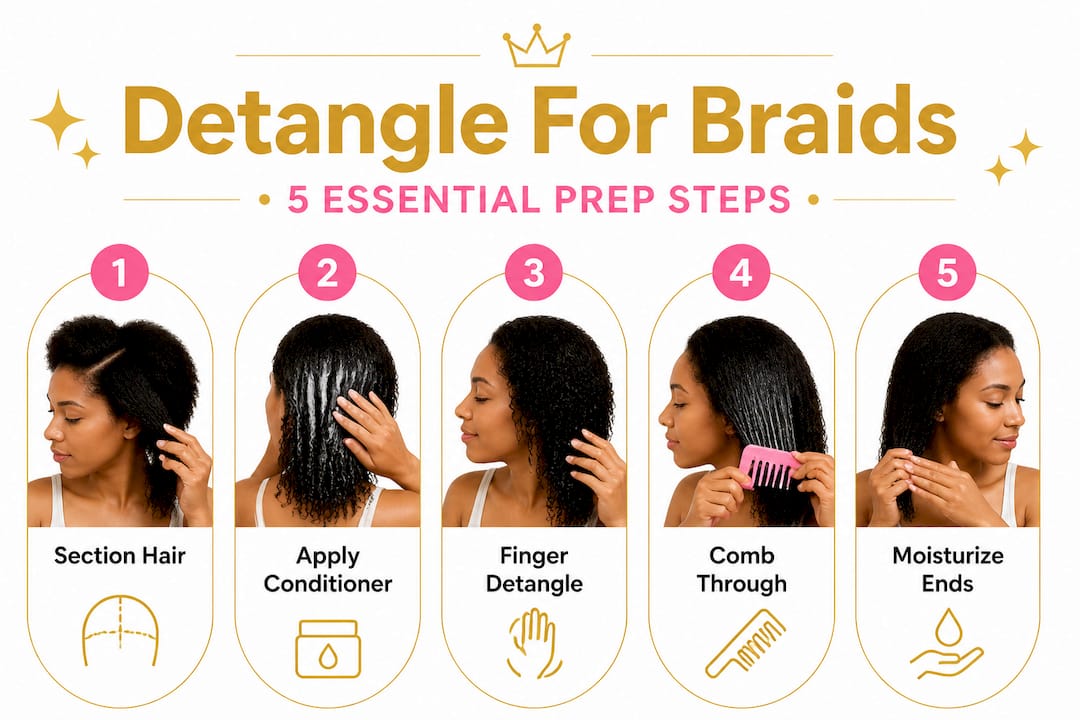
A good routine is not complicated, but it does need to follow a specific order to be effective. Here is the process we recommend for clients prepping at home before their appointment.
- Wash or co-wash your hair. Clean hair detangles more easily and gives your stylist a fresh canvas. Use a sulfate-free shampoo or a moisturizing co-wash to avoid stripping natural oils.
- Apply a generous amount of conditioner. Do not rinse it out yet. This is your slip layer. Work it through each section with your fingers before picking up any tool.
- Divide your hair into four to six sections. Clip or twist each section to keep them separate. Working in sections prevents already-detangled hair from re-tangling while you work on other areas.
- Start detangling from the ends. Hold the hair a few inches above the section you are working on to reduce tension on the scalp. Work the comb or brush from the tip of the strand upward toward the root in short, controlled strokes.
- Rinse and apply leave-in conditioner. After rinsing out your deep conditioner, apply a leave-in to each section while hair is still damp. This keeps the hair pliable and ready for styling.
- Twist or braid each detangled section. This protects your work and prevents re-tangling before you reach the salon.
| Timing option | Pros | Cons |
|---|---|---|
| Night before appointment | Hair is fully dry, less scalp irritation | May need light re-moisturizing in the morning |
| Morning of appointment | Hair is fresh and moisturized | Less time to address problem areas |
| Two or more days before | Allows for deep conditioning | Higher chance of re-tangling |
Most stylists, including our team at Afro Magic Braiding, agree that the night before is the sweet spot. Our customer reviews consistently mention how much smoother the braiding process feels when clients arrive with freshly detangled, moisturized hair.
Pro Tip: Always work from ends to roots. Starting at the root and dragging down pushes tangles toward the fragile ends and causes far more breakage than the bottom-up approach.
Common mistakes to avoid when detangling for box braids
Even with the best intentions, a few common errors can undo all your hard work or cause damage in the process.
- Detangling dry hair: This is the single most damaging thing you can do. Dry strands have no slip, so the comb tears through knots instead of releasing them. Always add moisture first.
- Using a fine-tooth comb: Fine teeth have no room to navigate around a knot. They pull through it, snapping strands in the process.
- Skipping sections: Rushing through and treating your hair as one big mass instead of working in sections leads to missed tangles that your stylist will find during braiding.
- Applying too much heat: Blow-drying before detangling to "loosen" the hair can actually make it more brittle and prone to breakage. If you want to use heat, apply it after detangling, not before.
- Being too aggressive: Yanking through a stubborn knot feels satisfying in the moment but causes real damage. Patience is a genuine hair care tool.
Common warning signs that you rushed the detangling process:
- Excessive shedding on your comb (more than normal daily shed of 50 to 100 hairs)
- Scalp tenderness that starts during detangling, not after braiding
- Visible frizz or bumps along freshly detangled sections
- Difficulty getting your sections to lie flat
Connecting with the Southfield braiding specialists at Afro Magic Braiding before your appointment can also help you get personalized advice on your specific hair type and texture.
Pro Tip: Preparation and patience prevent more breakage than any tool on the market. Give yourself at least 45 minutes for a thorough detangling session. Rushing this step costs you more time and hair in the long run.
A stylist's take: What most people miss when prepping for box braids
After working with hundreds of clients across every hair texture and type, one pattern stands out clearly. The number one reason clients experience pain after braiding is not the braiding itself. It is a rushed detangling step that left tiny, hidden knots behind.
These micro-knots are sneaky. They are too small to see easily but large enough to create a stress point when hair is braided over them. A good stylist will pause and work through them, but that adds time and can create tension in the surrounding hair. The clients who arrive thoroughly detangled, with hair that has been moisturized and twisted into sections, almost always report a more comfortable experience and a style that lasts longer.
Something else that most guides skip: detangling is not a one-size-fits-all process. A client with fine 3C curls needs a completely different approach than someone with dense 4C coils. The 3C client might be done in 20 minutes with a detangling brush and a light spray. The 4C client might need 90 minutes of careful finger detangling followed by a wide-tooth comb. Knowing your own hair type and adjusting your routine accordingly is what separates a good prep session from a great one.
We have also seen clients who detangle beautifully but then sleep on a cotton pillowcase the night before their appointment and arrive with new tangles at the nape and edges. A satin bonnet or satin pillowcase protects all that work. It is a small detail that makes a real difference. You can see stylist work to understand the level of finish that proper prep makes possible.
Investing time in your detangling routine is not just about one appointment. It builds a habit of hair care that protects your strands between every protective style.
Ready for flawless box braids? Let the Southfield pros help
You have put in the work to understand what your hair needs. Now let us take it from here. At Afro Magic Braiding, our stylists are trained to work with every texture and curl pattern, and we bring that same care and expertise to every appointment. Whether you are booking your first set of box braids or you are a protective style regular, we make sure your hair is treated with the attention it deserves.

Browse our see our braid styles to find the look that speaks to you, then book your appointment to secure your spot. Have questions about how to prep for your specific hair type? Reach out and contact Afro Magic Braiding directly. We love helping clients arrive confident and ready for a style that is truly theirs.
Frequently asked questions
Can I detangle my hair the same day as getting box braids?
Yes, same-day detangling works, but doing it the night before or a few hours ahead gives your scalp time to settle and allows products to absorb fully, reducing irritation during braiding.
What should I do if my hair gets tangled during the braiding process?
Pause and gently work through the knot using your fingers or a wide-tooth comb, then reapply a small amount of detangling spray or leave-in conditioner to restore slip before continuing.
Do I need professional products to detangle effectively?
Not at all. A seamless wide-tooth comb paired with a good leave-in conditioner or detangling spray is enough for most hair types, regardless of whether the products are salon-grade or drugstore.
Is it okay to detangle on dry hair?
Detangling dry hair significantly increases breakage risk. Always work on slightly damp or conditioned hair so the strands have enough slip to release knots without snapping.
How do I keep my hair detangled before my braiding appointment?
After detangling, twist or loosely braid each section and cover your hair with a satin bonnet or scarf. This protects your work and prevents friction from creating new knots before you reach the salon.
Recommended
- Best Hair Braiding in Southfield Michigan | Afro Magic Braiding Hair - Knotless Braids Southfield
- Best Hair Braiding in Southfield Michigan | Afro Magic Braiding Hair - Knotless Braids Southfield
- Best Hair Braiding in Southfield Michigan | Afro Magic Braiding Hair - Knotless Braids Southfield
- Best Hair Braiding in Southfield Michigan | Afro Magic Braiding Hair - Knotless Braids Southfield